
When you are developing an application, there are some important things that should not fall into the hands of strangers. We call them secrets. Secrets are one of the most valuable resources in your application, because they control strategic points. For example, API keys control access to consumable information from external vendors, AWS IAM credentials control access to cloud infrastructure and deployments, and SQL database passwords control access to valuable information stored in databases.
It’s often necessary to share secrets, of course. The trick is to do it in a way that ensures that only the people you want to share them with receive them. We as developers need to establish a secure and trusted way that we can control and use those secrets in all phases of the Software Development Life Cycle (SDLC).
Traditionally, developers would place secrets inside persistent files and configuration entries in the filesystem, hard-coded and possibly under some permission levels. This method turned out not to be scalable, since it required manual effort to change configurations. Nor was it very safe to store secrets in regular files, with only OS-level access control available to secure them.
A better approach is to store secrets in a centralized system for dynamic environments where we need to provision instances on demand and not located in a file somewhere. In addition, we cannot audit who, or what can access those values or alter them on demand. This is only the tip of the iceberg when it comes to the inflexibility of this approach.
In this tutorial we present a better, safer and more scalable way to access secrets using CyberArk Conjur and Secretless Broker. We start with an example Node.js application that connects to a PostgreSQL database and then gradually move all our secrets to Secretless Broker using CyberArk Conjur as our secrets provider.
Let’s get started.
Project Architecture
The basic idea behind the project is depicted in the following diagram:
Here we can see the following entities:
App: Our Application that needs to access the Target Service in a secure and scalable way.
Secure Broker: A mediator connection proxy agent that handles all the secrets on behalf of our Application. It maintains a source of truth taken from the Secure Vault and forwards all the requests to the Target Service.
Target Service: A protected endpoint that our application needs to access via a secure method.
Vault: The source of our secrets. It’s a centralized provider of sensitive information that can be scaled or interchanged dynamically.
We realize the outcome of this approach is to make the system more secure as it minimizes the attack space. Our app does not need to have direct access to credentials nor contain any custom logic to update them. We cannot inspect the App container for secrets or perform secrets hunting that easily.
With that in mind, let’s start building our Application. In this tutorial we will:
- Start with an example Node.js application that connects to a PostgreSQL database in a traditional way.
- Gradually introduce Secretless Broker server to proxy connections to it using the environmental provider.
- Show how we quickly switch to use the CyberArk Conjur provider to simplify credential management.
Prerequisites
If you’d like to follow along as we run through this tutorial, you should first make sure you have installed the following on your machine:
Traditional Application
Let’s say we have a Node.js application that connects to a PostgreSQL database using SSL and performs some queries in a traditional way. For this to happen, some sensitive information is required by the application to initiate the connection.
First create the index.js file for our application logic:
File: index.js
const { Pool } = require('pg');
const path = require('path');
const fs = require('fs');
require('dotenv').config();

var config = {
    user: process.env.APPLICATION_DB_USER,
    host: process.env.POSTGRES_HOST,
    password: process.env.APPLICATION_DB_INITIAL_PASSWORD,
    database: process.env.POSTGRES_DB,
    port: 5432,
    ssl : {
        rejectUnauthorized : false,
        key: fs.readFileSync(path.resolve(__dirname, 'pg_server.key')).toString(),
        cert: fs.readFileSync(path.resolve(__dirname, 'pg_server.crt')).toString(),
    }
};

const pool = new Pool(config)
pool.connect()
  .then(client => {
    console.log('connected')
        // promise
    client.query('SELECT * FROM names')
    .then(res => {
      console.log(res.rows)
      client.release();
    })
    .catch(e => console.error(e.stack))
  })
  .catch(err => console.error('error connecting', err.stack))
  .then(() => pool.end())
We use the dotenv package to load environment variables from a file. Let’s create that file and write down some initial configuration variables:
File: .env
POSTGRES_DB=express
POSTGRES_HOST=localhost
APPLICATION_DB_USER=app_user
APPLICATION_DB_INITIAL_PASSWORD=app_user_password
Before we can run the app, we need to install the dependencies:
$ npm init # to initialize the project

$ npm install pg dotenv --save
Next we need to create the SSL certificates that we will use to secure the connection between the server and our application:
$ openssl req -new -x509 -days 365 -nodes -text \
-out pg_server.crt \
-keyout pg_server.key \
-subj "/CN=pg"

$ chmod og-rwx pg_server.key
If we run the application now we will get a connection error because we haven’t configured a PostgreSQL instance yet. So let’s set up our database now.
First we’ll update the .env file to add the pg admin username and password variables.
File: .env
...
POSTGRES_USER=postgres
POSTGRES_PASSWORD=postgres
...
Create the following Dockerfile to load the certificates in the path for the database server:
File: Dockerfile
FROM postgres:11-alpine

COPY pg_server.key /var/lib/postgresql/server.key
COPY pg_server.crt /var/lib/postgresql/server.crt

# update the privileges on the .key, no need to touch the .crt
RUN chmod 600 /var/lib/postgresql/server.key
RUN chown postgres:postgres /var/lib/postgresql/server.key
Build this image and give it a name or a tag:
$ docker build -t mypg:01 .
Then run the PostgreSQL container using the following command:
$ docker run \
  --env-file .env \
  --name postgres \
  -d \
  -p 5432:5432 \
  mypg:01 \
  -c ssl=on \
  -c ssl_cert_file=/var/lib/postgresql/server.crt \
  -c ssl_key_file=/var/lib/postgresql/server.key
The above command will start a container in SSL mode, expose the port 5432 and load any environmental variables from the .env file.
Before we continue, it’s best if we configure the database to create the application’s username and password and populate it with some data so that we can connect to the app’s database:
$ docker exec postgres bash -c "psql -U \$POSTGRES_USER <<-EOSQL
/* Create Data Structures */
CREATE DATABASE \$POSTGRES_DB;

\c \$POSTGRES_DB;

CREATE TABLE names (
  id serial primary key,
  name varchar(256)
);

/* Create Application User */
CREATE USER \$APPLICATION_DB_USER PASSWORD '\$APPLICATION_DB_INITIAL_PASSWORD';

/* Add Grants */
GRANT SELECT, INSERT ON names TO \$APPLICATION_DB_USER;
GRANT USAGE, SELECT ON SEQUENCE names_id_seq TO \$APPLICATION_DB_USER;

/* Populate Values */
INSERT into names(name) values ('Alex'), ('Mike'), ('Roger');

EOSQL
"
Now if we run the application again we can see the query results in our console:
$ node index.js
connected
[ { id: 1, name: 'Alex' },
  { id: 2, name: 'Mike' },
  { id: 3, name: 'Roger' } ]
The following figure depicts what we have done so far:

As you may have noticed, we need a few pieces of information beforehand in place to create a connection with the Database, such as the Application Password, Username and certificates. Ideally we want to have only one piece of information which is the host where we want to connect to. That will make our Application less vulnerable to exploits, and easier to maintain. In the next section we are going to incorporate Secretless Broker so that our application only has to deal with hostnames, and not passwords.
Using Secretless Broker
As we mentioned before, we need to outsource our secrets that the application uses to Secretless Broker, which is another server that delegates our handling of secrets using Built-In Credential Providers.
Let’s start by removing all secrets from our application:
Update the config object in index.js to include only the host, database and port with the following values (removing all other entries):
File: index.js
var config = {
    host: process.env.POSTGRES_HOST,
    database: process.env.POSTGRES_DB,
    port: 5432
};
...
The lines that we’re removing specify the credentials and SSL certificates that should be used to connect to the database, but when the app is connecting to the database via Secretless it will no longer need this info:
# these are the lines we're removing from index.js
user: process.env.APPLICATION_DB_USER,
password: process.env.APPLICATION_DB_INITIAL_PASSWORD,
ssl : {
  rejectUnauthorized : false,
  key: fs.readFileSync(path.resolve(__dirname, 'pg_server.key')).toString(),
  cert: fs.readFileSync(path.resolve(__dirname, 'pg_server.crt')).toString(),
}
Instead of telling the application how to connect to the actual PostgreSQL database, we’ll configure Secretless to be able to connect to it. Secretless gets its configuration from a YAML file, secretless.yml:
File: secretless.yml
version: "2"
services:
  express-postgres:
    protocol: pg
    listenOn: tcp://0.0.0.0:5454
    credentials:
      address: 172.17.0.2:5432
      username:
        from: env
        get: APPLICATION_DB_USER
      password:
        from: env
        get: APPLICATION_DB_INITIAL_PASSWORD
This file describes which sockets Secretless should listen on, what kind of connection is coming over that socket, and where to get the secrets from. In the configuration above, we have defined an express-postgres service that will use the PostgreSQL connector to proxy connections to a server located at 172.17.0.2:5432. The listenOn: tcp://0.0.0.0:5454 line means that Secretless expects connections requests to come from clients on port 5454.
You may be wondering how we got that IP address for Postgres. We have to inspect the Postgres container to get its IP address:
$ docker inspect -f '{{range .NetworkSettings.Networks}}{{.IPAddress}}{{end}}' postgres
172.17.0.2
Ideally, in a container orchestration environment like Kubernetes, you should define services and use the service hostname instead of the IP address, or use a service discovery.
Next we need to revise our environment files. The application environment file .env can be updated so it only contains info about the host and the database name (note: delete all other entries from .env):
File: .env
POSTGRES_DB=express
POSTGRES_HOST=localhost
Notice that the application no longer has access to the database credentials.
We can also create a new file for the environment configuration that Secretless will use:
File: .secretless-env
APPLICATION_DB_USER=app_user
APPLICATION_DB_INITIAL_PASSWORD=app_user_password
Now let’s start the broker:
$ docker run \
  --env-file .secretless-env \
  --name secretless \
  -p 5454:5454 \
  -d \
  -v $PWD/secretless.yml:/etc/secretless.yml \
  cyberark/secretless-broker:latest
If we do everything right and run the application again, we will see the following result:
$ node index.js
error connecting error: password authentication failed for user "theo"
This is because we forgot to change the port for our application to the one that the broker listens to. Change the config.port in the index.js file property from 5432 to 5454 and re-run:
$ node index.js
connected
[
  { id: 1, name: 'Alex' },
  { id: 2, name: 'Mike' },
  { id: 3, name: 'Roger' }
]
Congratulations! Your work here as a developer is done.
The following figure depicts what we have done so far:

Using CyberArk Conjur Provider
So far we have seen how to use Serverless Broker where the credentials are provided to Secretless from its environment. The job as application programmers now is done, as we have relayed the secrets management from our side to the broker side.
As Security Admins though, we need to work a little bit more to ensure we have a better way to secure and handle hard-coded secrets.
In this situation we are going to use Conjur, which is a cloud-native Secrets Management Service.
For the following steps we assume that you have setup a Conjur Server and have configured its endpoint. The easiest way you can do that is to use docker-compose.
First create a docker-compose.yml that will load all the Conjur services:
File: docker-compose.yml
version: '3'
services:
  database:
    image: postgres:9.3
    container_name: postgres_database

  conjur:
    image: cyberark/conjur
    command: server -a myConjurAccount -p 3000
    ports:
      ["3000:3000"]
    environment:
      CONJUR_APPLIANCE_URL: http://localhost:3000
      DATABASE_URL: postgres://postgres@database/postgres
      CONJUR_DATA_KEY: "W0BuL8iTr/7QvtjIluJbrb5LDAnmXzmcpxkqihO3dXA="
    networks:
      - default
    links:
      - database

  conjur_cli:
    image: cyberark/conjur-cli:5
    entrypoint: []
    command: sleep infinity
    environment:
      CONJUR_APPLIANCE_URL: http://conjur:3000
      CONJUR_ACCOUNT: myConjurAccount
      CONJUR_AUTHN_LOGIN: admin
    volumes:
      - ./policy:/policy
    links:
      - conjur
In the docker-compose file above we start the conjur server with the following command:
command: server -a myConjurAccount -p 3000
Which creates a server account named myConjurAccount using port 3000. We also pass a random base64 string for CONJUR_DATA_KEY.
Next, let’s define a policy for one user and one host for the Postgres database secrets:
File: policy/ExpressApp.yml
---
- !policy
  id: ExpressApp
  body:
    - !policy
      id: alfa
      body:
        # Secret Declarations
        - &secrets
          - !variable pgPassword
          - !variable pgUsername

        # User & Manager Groups
        - !user Alex
        - !host myExpressApp
        - !permit
          role: !user Alex
          privileges: [ read, execute, update ]
          resources: *secrets
        - !permit
          role: !host myExpressApp
          privileges: [ read, execute ]
          resources: *secrets
Let’s run the Conjur containers:
$ export COMPOSE_PROJECT_NAME=demo

$ docker-compose up
As the containers are spinning up, we should observe the log. At some point it will generate the admin API key that we need to keep for later:
...
-----BEGIN PUBLIC KEY-----
conjur_1      | MIIBIjANBgkqhkiG9w0BAQEFAAOCAQ8AMIIBCgKCAQEA8DaIgnB9WeUTBEKpNgfk
conjur_1      | wkYHoXP1fO8HbAcsDrDH5JI2H9P4biZorpw075slqu4WRdwAYiC1dJ4Zf7bjlx68
conjur_1      | ZnX9Y6uuZ2VCDaUr2mu+EtfHXcx7NLzO0UTXcnlOq1tDBSddcc9AdJ3QzU8fMxQB
conjur_1      | 8xrBmTEf9QQobPSfIUaH8jn9zfTw9YRYbzKD57R1FmpnbBAAdndcACfWbWxHq7hV
conjur_1      | 00+b4cgKq3VVipUZjkqwy9DKWkhCsAzsj0hs4KPnyMDRwM8bu4VyzQ4zYOdvurQh
conjur_1      | IOPtWsZ7mIPzbIIg8QO9jQNZQqsbi+K3KJbRPHvzDmpQfFb/+MpS8QqMhkS7r+2Q
conjur_1      | rwIDAQAB
conjur_1      | -----END PUBLIC KEY-----
conjur_1      | API key for admin: 2nt5wb53zc2pwa3xvg54p305bsc229zbeg2hd0jkg1652ayt1b5xxds
...
After the services have started, we need to load the policy file using the Conjur client container in a new terminal window.
$ export COMPOSE_PROJECT_NAME=demo

$ docker-compose exec conjur_cli \
  conjur init \
  -u http://conjur:3000 \
  -a myConjurAccount # init client
Load the policy as the admin user using the API key from the container output above:
$ docker-compose exec conjur_cli conjur authn login -u admin # log in as admin – remember to use the API key from the container output

$ docker-compose exec conjur_cli conjur policy load root policy/ExpressApp.yml > my_app_data # load policy

$ docker-compose exec conjur_cli conjur authn logout # logout from admin
The file my_app_data has the API key for Alex:
$ cat my_app_data
Loaded policy 'root'
{
  "created_roles": {
    "myConjurAccount:user:Alex@ExpressApp-alfa": {
      "id": "myConjurAccount:user:Alex@ExpressApp-alfa",
      "api_key": "h9c1yg2ek9khf1jjtywz2xdh1w83dzn7hgj29tjm2ev2z0ra64rra"
    },
    "myConjurAccount:host:ExpressApp/alfa/myExpressApp": {
      "id": "myConjurAccount:host:ExpressApp/alfa/myExpressApp",
      "api_key": "224gnvr2gbx96z2nvgfq5241cqzkh1ww2j2trqb102gywj168rq8hf"
    }
  },
  "version": 1
}
Now that you’ve logged out as the admin user, log in as Alex using and add the secrets to the vault:
$ docker-compose exec conjur_cli conjur authn login -u Alex@ExpressApp-alfa # login as Alex

$ docker-compose exec \
  -e APPLICATION_DB_USER=app_user \
  -e APPLICATION_DB_INITIAL_PASSWORD=app_user_password \
  conjur_cli bash -c '
    conjur variable values add ExpressApp/alfa/pgPassword ${APPLICATION_DB_INITIAL_PASSWORD}
    conjur variable values add ExpressApp/alfa/pgUsername ${APPLICATION_DB_USER}
  '
Now that the secrets are stored in Conjur, we can remove them from the .secretless-env config file and update the secretless.yml to retrieve the secrets from the Conjur server instead of the Secretless environment.
First let’s revise secretless.yml as follows, updating the Secretless configuration so it will retrieve the username and password from Conjur instead of from the environment:
File: secretless.yml
version: "2"
services:
  express-postgres:
    protocol: pg
    listenOn: tcp://0.0.0.0:5454
    credentials:
      address: 172.17.0.2:5432
      username:
        from: conjur
        get: ExpressApp/alfa/pgUsername
      password:
        from: conjur
        get: ExpressApp/alfa/pgPassword
Stop and remove the running Secretless container. You can run docker ps -a | grep cyberark/secretless to find its container ID and then run the following command to remove it:
$ docker rm -f [Secretless container ID]
We’re going to restart Secretless with its new configuration and without the database credentials in its environment. To actually make everything work we need to supply some extra environmental variables for Secretless to connect to Conjur.
We need the following variables:
- CONJUR_APPLIANCE_URL: The address of the Conjur Server. For example
http://conjur. - CONJUR_ACCOUNT: The name of our account. For example
myConjurAccount. - CONJUR_AUTHN_LOGIN: The username login. For example
host/ExpressApp/alfa/myExpressApp - CONJUR_AUTHN_API_KEY: The api key for the host as saved in the my_app_data file.
Update the .secretless-env file to include just the following entries:
File: .secretless-env
CONJUR_APPLIANCE_URL=http://conjur:3000
CONJUR_ACCOUNT=myConjurAccount
CONJUR_AUTHN_LOGIN=host/ExpressApp/alfa/myExpressApp
CONJUR_AUTHN_API_KEY=<API key from my_app_data for host ExpressApp/alfa/myExpressApp>
As a last step, we need to restart the Secretless container:
$ docker run \
  --env-file .secretless-env \
  --name secretless \
  -p 5454:5454 \
  -d \
  -v $PWD/secretless.yml:/etc/secretless.yml \
  cyberark/secretless-broker:latest
By default the Secretless container will be added to the
bridge Docker network, which will enable it to communicate with the PostgreSQL container. Since it also needs to be able to communicate with the Conjur container, we’ll need to add it to the demo_default network:
$ docker network connect demo_default [Secretless container ID]
Remember that to get the Secretless container ID you can run docker ps -a | grep cyberark/secretless.
Now we can just verify that our app works as expected without modifications:
$ node index.js
connected
[
  { id: 1, name: 'Alex' },
  { id: 2, name: 'Mike' },
  { id: 3, name: 'Roger' }
]
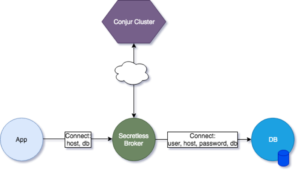
The following figure depicts what we have built so far:
Additional Resources for Reference
If you want to learn more about Secretless Broker and Conjur you can visit the documentation pages for reference.
In particular, a key use case that Secretless Broker currently supports is applications being deployed in Kubernetes or OpenShift. For a comprehensive guide on updating your Kubernetes or OpenShift apps to use Secretless and Conjur OSS, please see the Secretless Conjur OSS guide.

Theo Despoudis is a Senior Software Engineer and an experienced mentor. He has a keen interest in Open Source Architectures, Cloud Computing, best practices and functional programming. He occasionally blogs on several publishing platforms and enjoys creating projects from inspiration.