
Microservices are taking the world by storm, and the movement isn’t showing signs of slowing down any time soon. The adoption of containerization technologies has only fueled the fire. Adopting a microservice architecture offers significant benefits to the organization in terms of maintainability, testability, and scalability.
However, adopting a microservice architecture isn’t all rainbows and unicorns. The interactions between different services present challenges, such as service discovery and security. In this article, we’re going to address the challenge of securing communication between different services and how you can create and maintain a public key store to support these efforts.
We’ll discuss what a public key store is, and what challenges you might face in using and maintaining a key store. Then we’ll walk through a simple example of how you can use Conjur to address these issues.
Why Do You Need a Public Key Store?
Let’s consider the case of two different services. We’ll call them the ‘Caller’ service and the ‘Receiver’ service. In our environment, we want ‘Caller’ to be able to communicate securely with the ‘Receiver’ service. A typical pattern we can use is that when we deploy a new instance of ‘Caller,’ we have it generate a new key pair, and submit its public key to a public key store.
Whenever the ‘Caller’ service sends a request to the ‘Receiver’ service, it signs the request with the private key. When the ‘Receiver’ service receives the request, it makes a request to the public key store for public keys submitted by the ‘Caller’ service. The ‘Receiver’ service then iterates through the keys it receives from the public key store to verify against the request from the ‘Caller’ service.
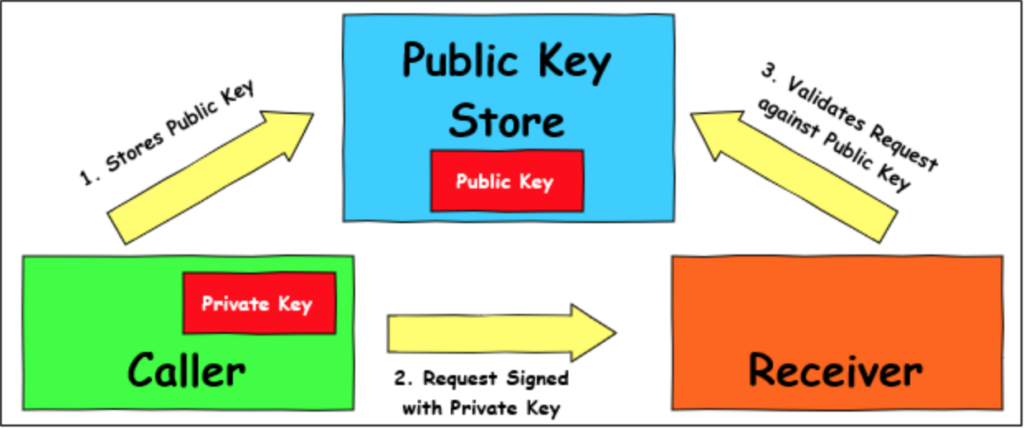
With this pattern, the ‘Receiver’ can easily verify that the ‘Caller’ service sent the request.
Challenges with the Public Key Store
There is one particular challenge that the pattern above might face. Let’s introduce a new service, which we’ll call ‘Hacker.’ When a bad actor deploys ‘Hacker,’ it creates a new key pair and submits the public key to the key store. However, when it submits the key, it self-identifies as the ‘Caller’ service.
If the ‘Hacker’ service can successfully submit a public key to the key store, and store it as a public key for the ‘Caller’ service, then any signed requests sent to the ‘Receiver’ service are incorrectly verified as legitimate requests from the ‘Caller’ service. So the challenge is to ensure that any service submitting a public key to the key store is a verified instance of that service.
One of the other challenges we need to address is the security of the key store itself. If the key store can be easily accessed and manipulated, then even the best upfront verification of keys can be thwarted. We also want a way to maintain the key store, removing expired keys, and auditing all requests to store and retrieve keys.
Why Conjur Makes Sense for Your Key Store
The lineage of Conjur is through CyberArk, a global leader in Privileged Access Security. The benefits of using Conjur for your public key store are:
- Role Based Access Control (RBAC), which controls and verifies access from non-human entities.
- Robust auditing capabilities.
- Security Policies as Code, allowing you to manage your policy in your source control system.
- Secure and tamper-proof data store.
Let’s consider the example we outlined above, and walk through the steps needed to implement this solution in Conjur. We’ll talk about RBAC, describe and explore the policy documents, and talk about how to load them. If you would like to experiment with Conjur, you can easily set up a Conjur environment by following the Quick Start guide.
Defining Policies to Use Conjur as a Key Store
We mentioned non-human identities above. We can also refer to non-human identities as machine identities. We can assign a machine identity to a stand-alone service, a container with a specific image, or any other self-contained system that interacts with Conjur.
We can manually configure machines, or we can use an orchestration tool or host factory to configure them automatically. You can learn more about different approaches you can use to establish machine identities in the Conjur Docs. For our example, we’ll need to create a policy that applies to any machine designated with the ‘Caller’ or ‘Receiver’ identities. Let’s look at what the policy might look like, and then we’ll dissect it and identify the critical parts. Below is our YAML policy file that we named public_key_store_policy.yml:
- !policy

  id: PublicKeyStore
  # Define hosts and variables to store the public keys
  body:
  - !host Caller
  - !host Receiver
  - !variable callerPublicKeys
    # Give read and write permissions to the Caller service.
  - !permit
    role: !host Caller
    privileges: [read, update, execute]
    resource: !variable callerPublicKeys
    # Give read permissions to the Receiver service.
  - !permit
    role: !host Receiver
    privileges: [read, execute]
    resource: !variable callerPublicKeys
Before we continue, it’s worth mentioning that the example we’re considering and the policy posted above are simplified and straightforward use cases. The beauty of the Conjur policy system is that it is scalable and can be easily automated. The principles we’re sharing here still apply, whether your managing two microservices or an enormous fleet of containers in a complex ecosystem.
Let’s dissect the policy. We start with an ID, which is used to identify this policy after we implement it. Next, we define the entities that are involved with this policy. We define both our services as hosts and then create a variable called callerPublicKeys. This variable is where we’ll store our public keys for the ‘Caller’ service.
The next section is where we assign privileges for each of the entities that are involved. We grant permission to any machine identified as a ‘Caller’ host to be able to read, update, and execute changes on the callerPublicKeys variable. These privileges allow the ‘Caller’ service to add new keys and update the key store as keys are removed and expire.
The ‘Receiver’ host is only granted the read and execute privileges. With these privileges, any machine that Conjur authenticates as a ‘Receiver’ can read the public keys to perform verification; but that is the extent of their allowed involvement.
Finally, let’s consider what happens when a machine attempts to access or update the variable without being explicitly defined in the policy. Conjur operates on the principle of least privilege. The principle of least privilege means that unless we explicitly define an entity in the policy and grant privileges to it, all access is denied by default. The ‘Hacker’ or any other service may attempt to update the public key for the ‘Caller’ service, but without rights, Conjur denies access and logs the attempt, for auditing purposes.
Learning More
If you would like to learn more about policies and how you can leverage Conjur to secure your public key store and support your security endeavors, I’d recommend starting with the Enrolling an Application and Delegating Policy Management tutorials. Conjur also provides extensive documentation, which is kept updated with the latest changes and newest features.
I’d highly recommend joining the CyberArk Commons. You can network with other engineers, ask for help, and contribute to the future of Conjur OSS.
Mike Mackrory is a Global citizen who has settled down in the Pacific Northwest — for now. By day he works as a Lead Engineer on a DevOps team, and by night, he writes and tinkers with other technology projects. When he’s not tapping on the keys, he can be found hiking, fishing and exploring both the urban and rural landscape with his kids. Always happy to help out another developer, he has a definite preference for helping those who bring gifts of gourmet donuts, craft beer and/or single-malt Scotch.