
With technology becoming a central part of our daily lives, we need to keep information safe from an equally rapidly growing community that is focused on exploiting the private information for personal gain. As a developer, you constantly struggle to make that information secure. You use secrets such as SSH keys, API tokens, passwords, and other credentials. They work, but you still need these secrets on hand for testing. How do you keep them secure, without exposing them in your codebase or leaking them in a repository?
It is important to ensure that secrets aren’t leaked to protect both your applications and data. After all, an object is only as strong as its weakest point, and that holds true for secrets in your application.
Even if your repositories are private, hardcoded secrets are still difficult to manage and rotate. So how exactly do you conform to the strict privacy policies and keep your secrets safe and secure – but easily accessible for testing? How can you be sure that you have removed all those hardcoded secrets from your codebase?
There are open source tools that allow you to scan your code for secrets. In this article, we’ll take a look at a few of the current open source solutions and test two of them: Trufflehog and CyberArk Conjur.
Finding Secrets
There has been a great demand to address the growing security risks. There are several ways to protect secrets from ending up in your code. Ultimately, the best way is prevention and having a clear process for managing your secrets securely.
To help us with prevention, tools such as Trufflehog scan your repositories regularly for secrets exposed in your code. This can be a great help; unfortunately, the current version of Trufflehog does not work on Windows. When you try to scan a repository, the tool throws an exception. It is unclear if this will be resolved.
There are alternatives, some of which are good. However, none of them are fully effective at finding all leaks. Here is a list of alternatives:
Trufflehog3 is a fork from the original Trufflehog. It does not have the bug that the original version has on Windows. However, it does not detect hardcoded passwords by default and tends to give a fair number of false positives. It is very effective when detecting private keys and API keys in your code.
Install Trufflehog3 with pip or the package manager for your system.
To demonstrate this we have a simple example of a console application that connects to a database with the connection string hardcoded and the password passed to the method. The actual password is “Password1” which we will change later but I have added a unique password (“EE4L8ejgzccuSIlvzYRFC7doKG6M90VQy9g7IeWdWSY”) below to demonstrate the entropy check.
internal class Program
{
  private static void Main(string[] args)
  {
    TestConnection("EE4L8ejgzccuSIlvzYRFC7doKG6M90VQy9g7IeWdWSY");
  }

  private static void TestConnection(string password)
  {
    string connectionString;
    SqlConnection cnn;
    connection String =
      $"Data Source=.\\MSSQLSERVER01;Initial Catalog=TestData;
      User ID=TestUser;Password={password}";
    cnn = new SqlConnection(connection String);
    cnn.Open();
    Console.WriteLine("Connection Open  !");
    cnn.Close();
  }
}
To scan a repository, in a terminal session run truffleHog3 with the path to the repository:
truffleHog3 "C:\Tutorials\RemovingSecrets"
And the results of the above command is displayed below:
~~~~~~~~~~~~~~~~~~~~~[92m
Reason: High entropy
Path:   RemoveSecrets/Program.cs
Branch: master
Commit: make the password unique
Hash:   5ca84705b70fd83e5d6326eaa883b3ecbdca6139
[0m-
      TestConnection("EE4L8ejgzccuSIlvzYRFC7doKG6M90VQy9g7IeWdWSY");
~~~~~~~~~~~~~~~~~~~~~
~~~~~~~~~~~~~~~~~~~~~[92m
Reason: High entropy
Path:   RemoveSecrets\Program.cs
Branch: None
Commit: None
Hash:   None
[0mTestConnection("EE4L8ejgzccuSIlvzYRFC7doKG6M90VQy9g7IeWdWSY");
~~~~~~~~~~~~~~~~~~~~~
~~~~~~~~~~~~~~~~~~~~~[92m
Reason: High entropy
Path:   RemoveSecrets\bin\Debug\netcoreapp3.1\RemoveSecrets.deps.json
Branch: None
Commit: None
Hash:   None
[0m"sha512": "sha512-38ugOfkYJqJoX9g6EYRlZB5U2ZJH51UP8ptxZgdpS07FgOEToV+lS11ouNK2PM12Pr6X/PpT5jK82G3DwH/SxQ==",
"sha512": "sha512-YhEdSQUsTx+C8m8Bw7ar5/VesXvCFMItyZF7G1AUY+OM0VPZUOeAVpJ4Wl6fydBGUYZxojTDR3I6Bj/+BPkJNA==",
"sha512": "sha512-KSrRMb5vNi0CWSGG1++id2ZOs/1QhRqROt+qgbEAdQuGjGrFcl4AOl4/exGPUYz2wUnU42nvJqon1T3U0kPXLA==",
"sha512": "sha512-ojD0PX0XhneCsUbAZVKdb7h/70vyYMDYs85lwEI+LngEONe/17A0cFaRFqZU+sOEidcVswYWikYOQ9PPfjlbtQ==",
"sha512": "sha512-9kyFSIdN3T0qjDQ2R0HRXYIhS3l5psBzQi6qqhdLz+SzFyEy4sVxNOke+yyYv8Cu8rPER12c3RDjLT8wF3WBYQ==",
"sha512": "sha512-JECvTt5aFF3WT3gHpfofL2MNNP6v84sxtXxpqhLBCcDRzqsPBmHhQ6shv4DwwN2tRlzsUxtb3G9M3763rbXKDg==",
"sha512": "sha512-80vGtW6uLB4AkyrdVuKTXYUyuXDPAsSKbTVfvjndZaRAYxzFzWhJbvUfeAKrN+128ycWZjLIAl61dFUwWHOOTw==",
"sha512": "sha512-LbrynESTp3bm5O/+jGL8v0Qg5SJlTV08lpIpFesXjF6uGNMWqFnUQbYBJwZTeua6E/Y7FIM1C54Ey1btLWupdg==",
"sha512": "sha512-z7aeg8oHln2CuNulfhiLYxCVMPEwBl3rzicjvIX+4sUuCwvXw5oXQEtbiU2c0z4qYL5L3Kmx0mMA/+t/SbY67w==",
~~~~~~~~~~~~~~~~~~~~~
~~~~~~~~~~~~~~~~~~~~~[92m
Reason: High entropy
Path:   RemoveSecrets\obj\project.assets.json
Branch: None
Commit: None
Hash:   None
[0m"sha512": "38ugOfkYJqJoX9g6EYRlZB5U2ZJH51UP8ptxZgdpS07FgOEToV+lS11ouNK2PM12Pr6X/PpT5jK82G3DwH/SxQ==",
"sha512": "JECvTt5aFF3WT3gHpfofL2MNNP6v84sxtXxpqhLBCcDRzqsPBmHhQ6shv4DwwN2tRlzsUxtb3G9M3763rbXKDg==",
"sha512": "LbrynESTp3bm5O/+jGL8v0Qg5SJlTV08lpIpFesXjF6uGNMWqFnUQbYBJwZTeua6E/Y7FIM1C54Ey1btLWupdg==",
"sha512": "80vGtW6uLB4AkyrdVuKTXYUyuXDPAsSKbTVfvjndZaRAYxzFzWhJbvUfeAKrN+128ycWZjLIAl61dFUwWHOOTw==",
"sha512": "z7aeg8oHln2CuNulfhiLYxCVMPEwBl3rzicjvIX+4sUuCwvXw5oXQEtbiU2c0z4qYL5L3Kmx0mMA/+t/SbY67w==",
"sha512": "9kyFSIdN3T0qjDQ2R0HRXYIhS3l5psBzQi6qqhdLz+SzFyEy4sVxNOke+yyYv8Cu8rPER12c3RDjLT8wF3WBYQ==",
"sha512": "YhEdSQUsTx+C8m8Bw7ar5/VesXvCFMItyZF7G1AUY+OM0VPZUOeAVpJ4Wl6fydBGUYZxojTDR3I6Bj/+BPkJNA==",
"sha512": "ojD0PX0XhneCsUbAZVKdb7h/70vyYMDYs85lwEI+LngEONe/17A0cFaRFqZU+sOEidcVswYWikYOQ9PPfjlbtQ==",
"sha512": "KSrRMb5vNi0CWSGG1++id2ZOs/1QhRqROt+qgbEAdQuGjGrFcl4AOl4/exGPUYz2wUnU42nvJqon1T3U0kPXLA==",
~~~~~~~~~~~~~~~~~~~~~
~~~~~~~~~~~~~~~~~~~~~[92m
Reason: High entropy
Path:   RemoveSecrets\obj\project.nuget.cache
Branch: None
Commit: None
Hash:   None
[0m"dgSpecHash": "rvkMOqWIo7+P+f1dcEwEelSHLss5UxTA4WpxtbxKriknB3E0KZTmlkUEfZIWULq3OupUZhl57/q8lrLhKPo+LQ==",
~~~~~~~~~~~~~~~~~~~~~
~~~~~~~~~~~~~~~~~~~~~[92m
Reason: High entropy
Path:   RemoveSecrets\obj\Debug\netcoreapp3.1\RemoveSecrets.AssemblyInfoInputs.cache
Branch: None
Commit: None
Hash:   None
[0m822473d132e96574c21f5fa8cf7f8a3922d7436c
~~~~~~~~~~~~~~~~~~~~~
~~~~~~~~~~~~~~~~~~~~~[92m
Reason: High entropy
Path:   RemoveSecrets\obj\Debug\netcoreapp3.1\RemoveSecrets.csproj.CoreCompileInputs.cache
Branch: None
Commit: None
Hash:   None
[0m47f27900352486b681b1c8d3f9a4f6b198cacc71
~~~~~~~~~~~~~~~~~~~~~
~~~~~~~~~~~~~~~~~~~~~[92m
Reason: High entropy
Path:   RemoveSecrets\obj\Debug\netcoreapp3.1\RemoveSecrets.genruntimeconfig.cache
Branch: None
Commit: None
Hash:   None
[0md6e3d2af7d562c728279cf338b4a11492ac5aa4d
~~~~~~~~~~~~~~~~~~~~~
The results above picked up the password passed to the TestConnection method only because the password itself has a high entropy level. If this was a worded password like “Password1” for example the scan would have missed it.
For the other alternatives listed above, you can simply download the binary or executable (.exe) file in the release section and use it like you would any console app in a terminal session as per their Readme files in GitHub respectfully.
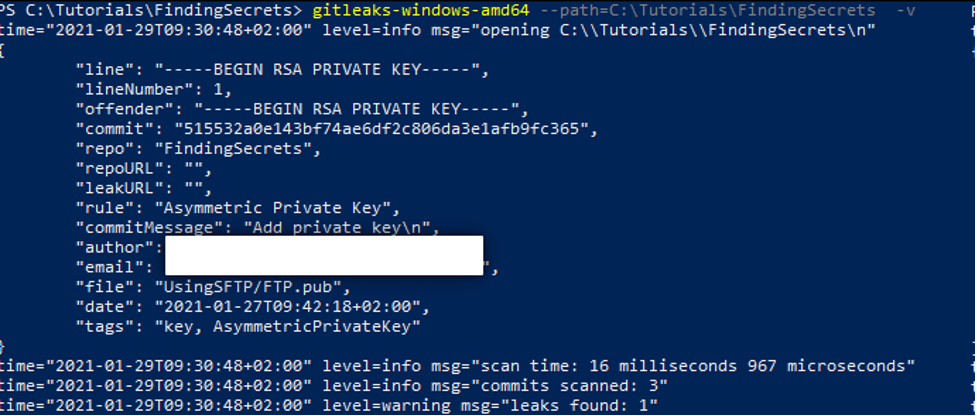
I also found GitLeaks very useful when it came to leaks concerning private keys. It should find hardcoded secrets as well, but that did not function properly in my example above.
As you can see, the above tools are useful, but none of them catches everything. Adding secret scanning to your CD/CD pipeline helps, but at best it is just one layer in what should be a multi-layer defense.
You need proper secret management from the start of a project, so that you never have a reason to put secrets in your code. This is where Conjur steps up secrets management considerably over these other examples.
Setting up Conjur
To install Conjur, we can set up a server following the installation documentation. The documentation includes the installation of Docker and Docker Tools; these had been replaced by Docker Desktop. Clone the Conjur Quickstart repository, then follow the steps in the Setup a Conjur OSS Environment.
Once we have the environment set up in Docker, we can proceed to create policies for our project. Conjur enables you to keep clear segregation between duties. For example you can have one policy for your database and another for calling the calling application, or back end and front end.
The example I am using in this article is simplistic to avoid confusion. I have created a console application that connects to a database and writes the result of a query to the console. The console application itself will utilize the frontend policy, and the database secrets will be stored in the db policy.
The policies are written in a YML file. Let’s start by creating two blank policies in a file called conjur.yml.
- !policy
  id: db

- !policy
  id: frontend
Once the file is created, we need to load it into Conjur which will convert the file into a policy. To do that, we first need to ensure that we are logged in. Let’s log in as admin with the following command.
docker-compose exec client conjur authn login -u admin
Conjur will ask you for your admin password that, if you followed the Setup instructions, is in the admin_data file.

We can then proceed to load the policy. Let’s replace any existing policies to ensure our new policy is the only one active at the moment.
docker-compose exec client conjur policy load --replace root conjur.yml
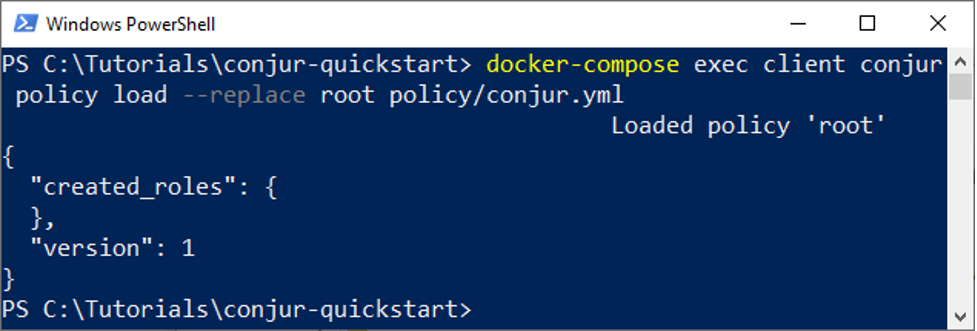
I put my file into the policy folder, so I need to prefix the file name with “policy/.”
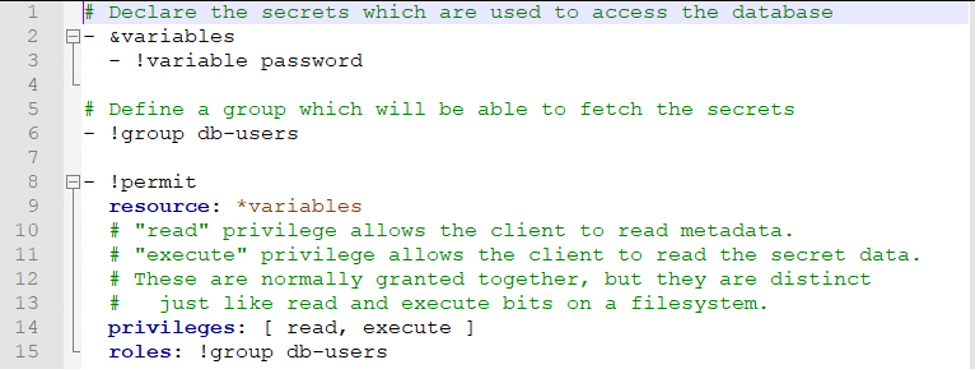
Now that the policies are loaded, we can set up the variables to be stored for our application. I will create the db.yml file to contain the variable for the database password. We also need to define who can access the secrets. For that, we will create a group called db-users. The db.yml file contains the following:
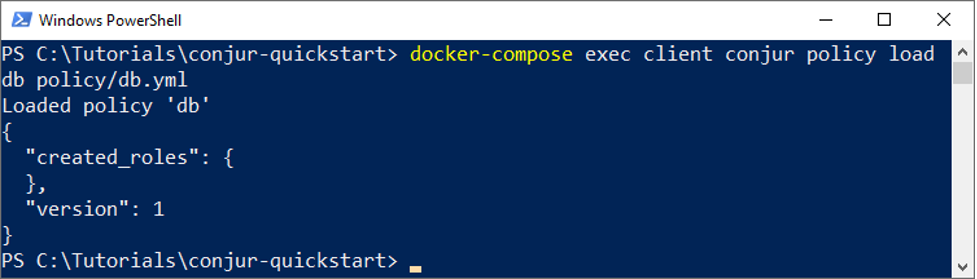
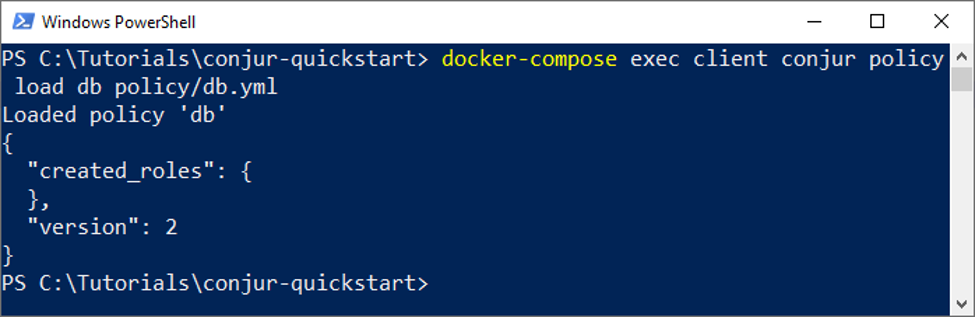
We now need to load the file with:
docker-compose exec client conjur policy load db policy/db.yml
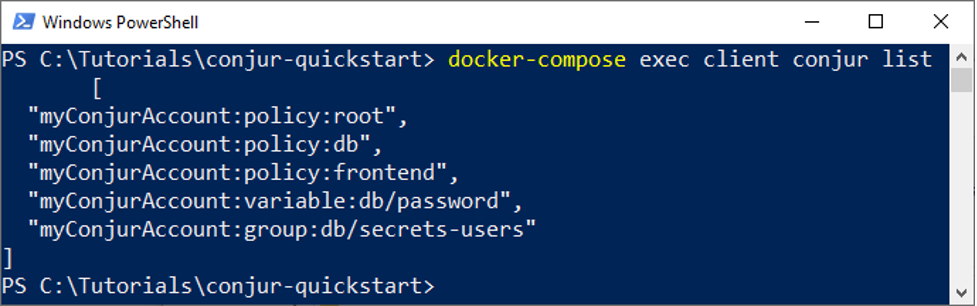
You can confirm that the policies have been loaded by running the list command:
docker-compose exec client conjur list
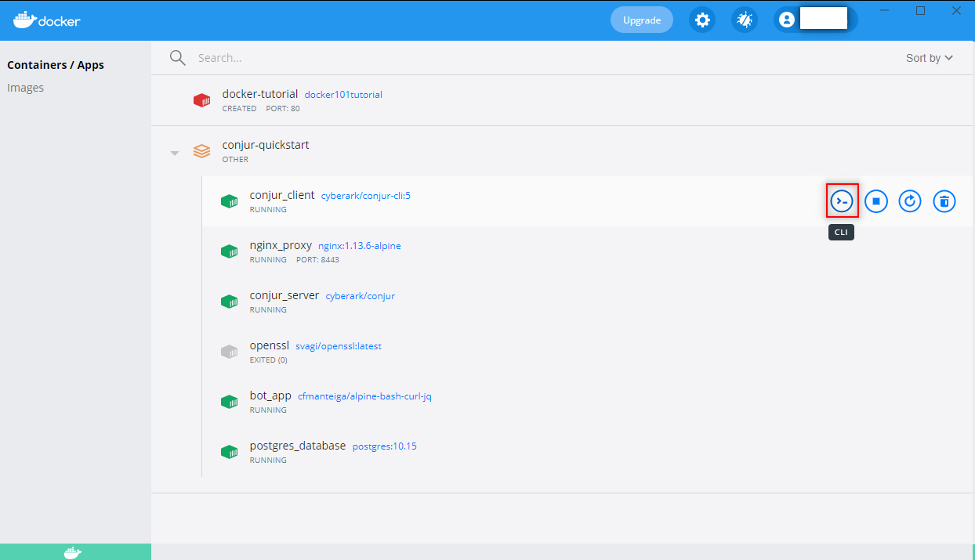
We now have the password variable password, which is empty at this stage. We need to assign a value to it using the secretValue=[value] syntax. This, however, won’t work in PowerShell. That’s why I’ll do it in the Conjur client directly. I’ll go to the Conjur client in Docker and start up the CLI.
Currently, the password is simply “Password1,” which is not sufficiently complex. Let’s generate a new, random password, which we will store and assign to our database. We will store that password in the secretVal variable, and we’ll run openssl to generate a password for us.
secretVal=$(openssl rand -hex 12 | tr -d '\r\n')
Now you can run the Conjur command directly and store the values you require as shown below.
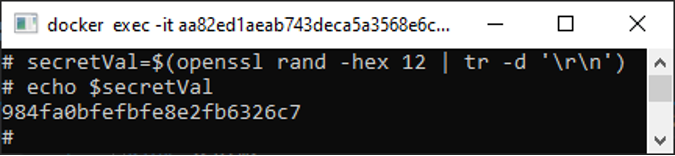
You can echo the variable to see what is stored in it. Be sure to change your database password to the generated value so that they can match later when you will be retrieving it.
Now we just need to add it to Conjur:
conjur variable values add db/password ${secretVal}

We now have the database password stored in Conjur, but we still want our app to be able to retrieve the secrets. For that, let’s load the frontend policy.
- !layer

- !host frontend-01

- !grant
  role: !layer
  member: !host frontend-01
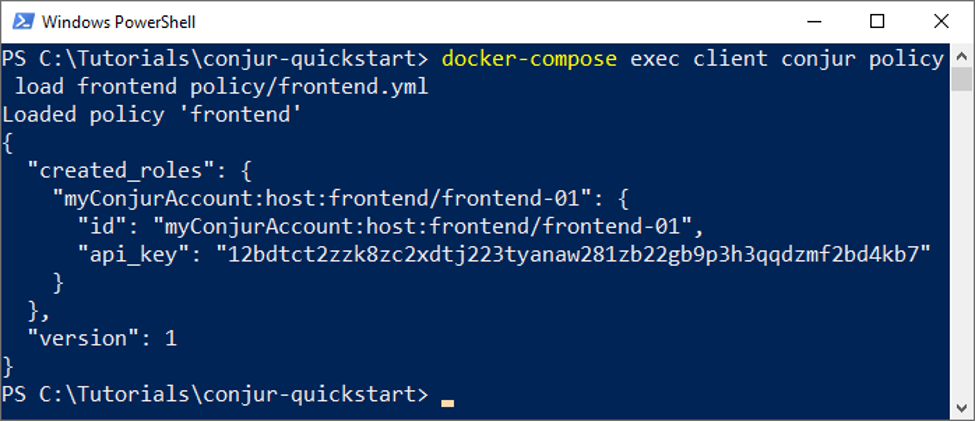
We load it the same way as we did the db policy.
docker-compose exec client conjur policy load frontend policy/frontend.yml
Now that the front end layer is loaded, all that’s left is to add it to the group by editing the db.yml file as follows:
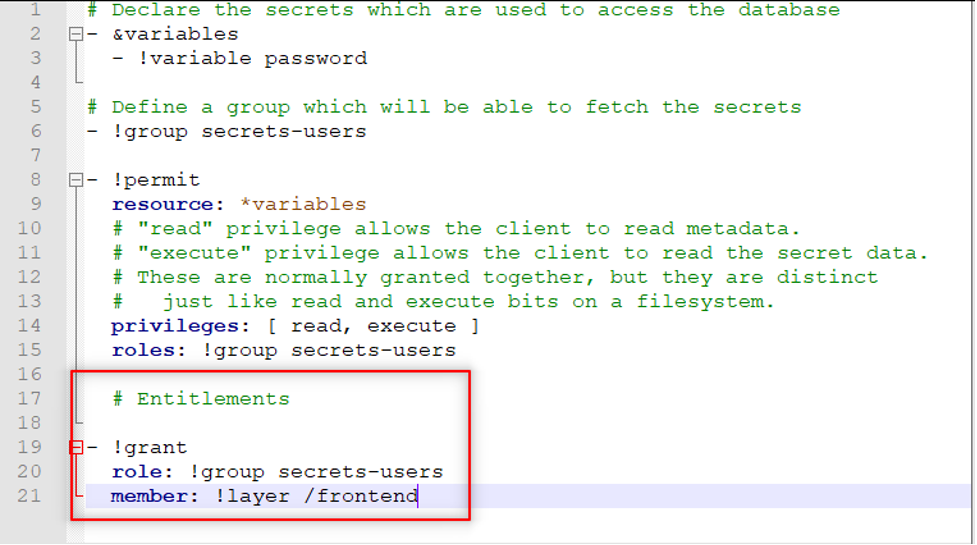
This added section above basically assigns the secrets-user role to the frontend layer. Update the policy again using the load command.
docker-compose exec client conjur policy load db policy/db.yml
Retrieving Secrets
Now we have our secrets stored in Conjur. Time to configure our application to retrieve the secrets to access the required resources. To achieve this Conjur has created Client Libraries with APIs to connect to the Conjur server and retrieve the variables in your source code. Depending on your preferred coding language you will select the appropriate API. Currently, there are five supported APIs namely:
- Java
- GO
- Ruby
- .Net Framework
To download one of these libraries please refer to the API List and select the library relevant for your project. Since my example is in C# I’ll use the .Net library. Selecting one of these libraries will take you to a page with a link to a GitHub repository with the source code of the relevant library.
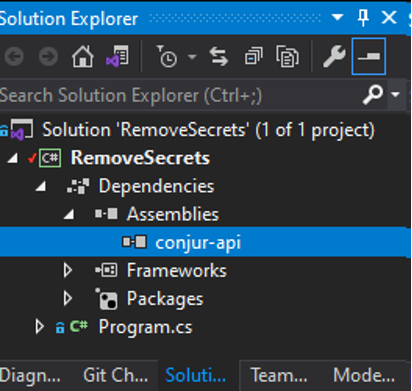
Clone the repository to the selected library and build the project to get the required DLL files to be loaded into our project. Once the project is built we can then add the reference to the conjur-api, normally located in the bin folder of the library project, to our sample project created at the beginning of this article.
Now let’s instantiate a client and add the code for retrieving the db/password variable that we stored earlier in Conjur.
Add a method to retrieve the Conjur client.
private static Conjur.Client GetClient(string host, string account, string username, string password, string certificatePath)
{
  var conjurClient = new Client(host, account);
  conjurClient.TrustedCertificates.ImportPem(certificatePath);
  conjurClient.LogIn(username, password);
  return conjurClient;
}
Add a line to instantiate the client in your Main method
var client = GetClient("https://localhost:8443/", "myConjurAccount", "admin", "{yourAdminPassword}", @"C:\Tutorials\conjur-quickstart\conjur.pem");
The host will be the host of your Conjur server. If it is in a Docker container this will be the URL of the exposed NGINX proxy on port 8443.
The account will be the account name used when you set up the OSS Conjur Server.
We are using admin for the user but you can set up other users for Conjur.
The password in this case is the same password we used to create the variables.
The certificate path is the location for the conjur pem file to ensure you can access the Conjur server securely. To retrieve the pem file you can run the following command:
openssl s_client --showcerts --connect localhost:8443 < /dev/null 2> /dev/null | sed -ne '/-BEGIN CERTIFICATE-/,/-END CERTIFICATE-/p' > conjur.pem
We have stored the pem certificate file in our conjur-quickstart directory so we will use that full path.
These values normally would be either in a config file or a separate database but we have included them in the code for visibility purposes.
Now all that is left is to replace the hardcoded password with the code to retrieve the password:
client.Variable("db/password").GetValue();
Here is the full finished class:
internal class Program
{
private static void Main(string[] args)
{
var client = GetClient("https://localhost:8443/",
"myConjurAccount", "admin", "{yourAdminPassword}",
@"C:\Tutorials\conjur-quickstart\conjur.pem");
var password = client.Variable("db/password").GetValue();
TestConnection(password);
}
private static void TestConnection(string password)
{
string connetionString;
SqlConnection cnn;
connetionString =
$"Data Source=ZA-PLZ-L-QUINTE\\MSSQLSERVER01;
Initial Catalog=TestData;User ID=TestUser;Password={password}";
cnn = new SqlConnection(connetionString);
cnn.Open();
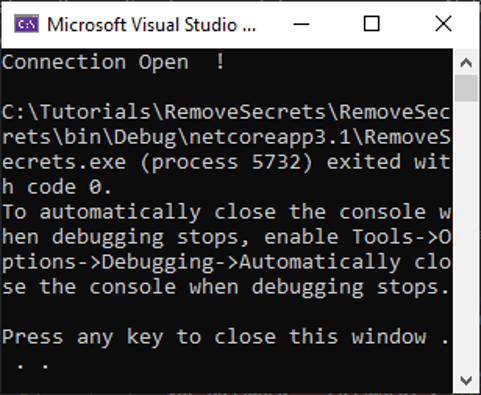
Console.WriteLine("Connection Open !");
cnn.Close();
}
private static Conjur.Client GetClient(string host, string account,
string username, string password, string certificatePath)
{
var conjurClient = new Client(host, account);
conjurClient.TrustedCertificates.ImportPem(certificatePath);
conjurClient.LogIn(username, password);
return conjurClient;
}
}
Run the application to ensure that the client is configured correctly… and you are all done. At this point, you can scan your repo again to see if you have any secrets left exposed.
Note: If you get a reference exception for the configuration manager (“System.Configuration.ConfigurationManager”) simply add the NuGet package with the same name to your project.
Next Steps
It is critical to ensure that your secrets are kept safe to prevent breaches. By centralizing your secrets, you can make management and rotation easier. Open source tools like Trufflehog and its alternatives can help you find potential leaks. In the end, however, prevention is always better than remediation. Conjur allows you to prevent secret leaks using the retrieval pattern. It offers many options for making your application ready to meet all your secrets management needs.