
This blog will walkthrough the setup of GKE Autoneg, along with creating all the resources you need e.g.
- Backends
- Health Checks
- Target Proxies
- URL Maps
- Forwarding Rules
- Firewalls
- SSL Certificates
Many people host public-facing web applications in Kubernetes. In Google Cloud, using the Ingress or Gateway APIs alongside GCP’s Layer 7 load balancers works really well.
For most, using the standard GKE Ingress Object is sufficient enough. However, what happens when you have complicated ingress routing requirements, for example, using a blue/green model for Kubernetes Clusters, or have very specific routing requirements that GKE Ingress itself cannot solve?
Using Google Cloud Network Endpoint Groups (NEGs) can help with this. When using GKE, Google will create a NEG automatically when you use Container Native LoadBalancing, however the naming is hard to predict, and when you are re-creating clusters and / or services, attaching these NEGs to a backend becomes a challenge. This is even harder when it comes to Autopilot as you cannot see the nodes to create a Target Group; Google have already realised this is a problem and created GKE Autoneg.
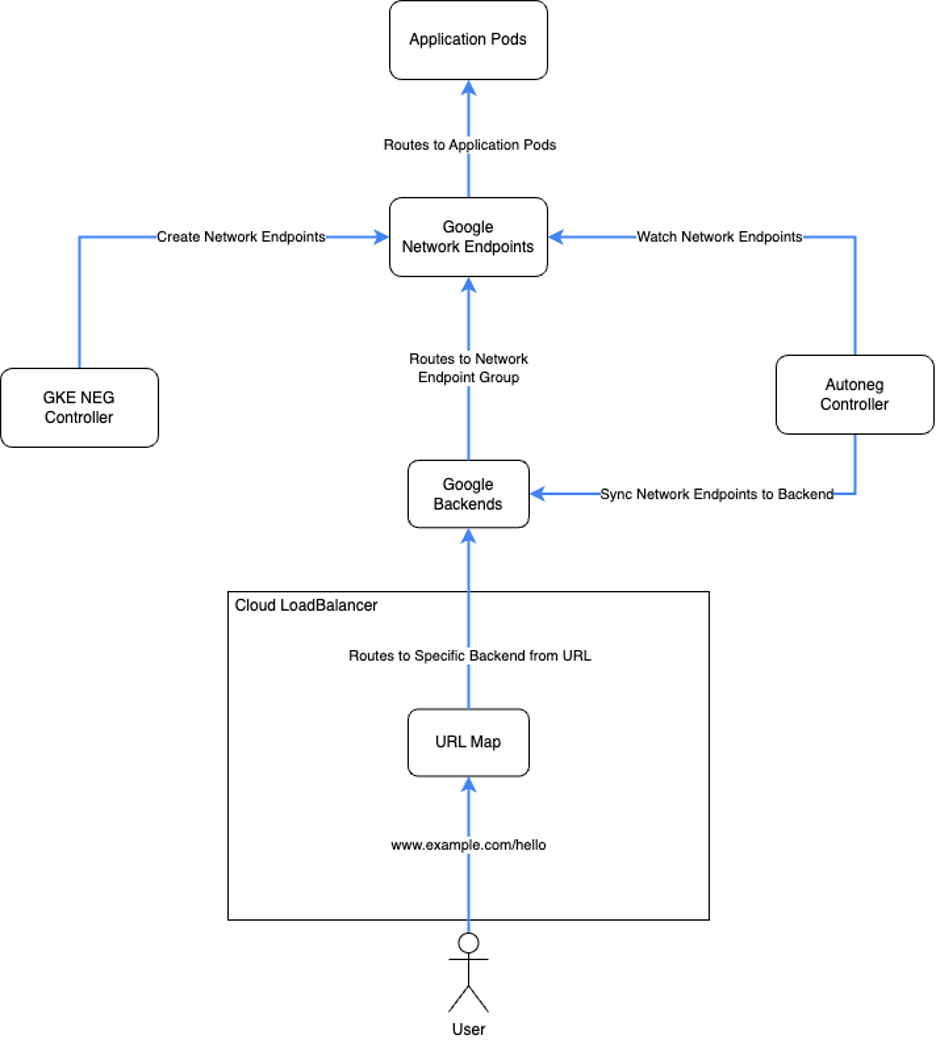
By the end of this blog, you should have a Google Cloud LoadBalancer that will be able to route to specific backends based on the URLs that you specify. These backends can exist in different clusters and/or namespaces, You can see a diagram of how this fits together below.
You can find the full code base used for this blog at https://github.com/jetstack/gke-simple-custom-ingress
Prerequisites
This blog assumes that you already have the following,
- A GKE Cluster ready to deploy into (either Autopilot or Standard)
- Terraform installed
- Configured with the Hashicorp Kubernetes Provider
- Version Tested: 2.16.1
- Configured with the Hashicorp Google Provider
- Version Tested: 5.10.0
- Configured with the Hashicorp Helm Provider
- v1.7.5 was used to create resources during the blog.
- Configured with the Hashicorp Kubernetes Provider
- CloudNAT created to allow images to be pulled from the Github Container Registry
- A Folder or project to store the code created
Preparing Terraform
We will need to include some resources to ensure that terraform can run successfully, these will vary depending on your current setup.
1. Store this code inside a file named providers.tf
terraform {
 required_providers {
   google = {
     source  = "hashicorp/google"
     version = "5.24.0"
   }
   google-beta = {
     source  = "hashicorp/google-beta"
     version = "5.24.0"
   }
   helm = {
     source  = "hashicorp/helm"
     version = "2.13.0"
   }
   kubectl = {
     source  = "alekc/kubectl"
     version = "2.0.4"
   }
 }
}

provider "google" {
 project = var.project_id
 region  = var.region
}

provider "google-beta" {
 project = var.project_id
 region  = var.region
}

provider "helm" {
 kubernetes {
   host  = "https://${data.google_container_cluster.cluster.endpoint}"
   token = data.google_client_config.provider.access_token
   cluster_ca_certificate = base64decode(
     data.google_container_cluster.cluster.master_auth[0].cluster_ca_certificate
   )
 }
}

provider "kubectl" {
 load_config_file = false
 host             = "https://${data.google_container_cluster.cluster.endpoint}"
 token            = data.google_client_config.provider.access_token
 cluster_ca_certificate = base64decode(
   data.google_container_cluster.cluster.master_auth[0].cluster_ca_certificate
 )
}
2. Store this code inside a file named variables.tf replacing anything inside <INSERT>
variable "project_id" {
 type        = string
 description = "ID for Project"
 default     = ""
}

variable "region" {
 type        = string
 description = "Region for Resources"
 default     = "europe-west2"
}

variable "dns_external_domain_name" {
 type        = string
 description = "DNS Domain Name for External Ingress"
 default     = ""
}

variable "dns_internal_domain_name" {
 type        = string
 description = "DNS Domain Name for Internal Ingress"
 default     = ""
}
Installing Autoneg
When you have your Kubernetes Cluster up and running, the first thing we need to do is install Autoneg; you can do that with the following Terraform Code,
1. Store this code inside a file named autoneg.tf
// This module will create a Custom IAM Role along with a Google Service Account for Autoneg
module "autoneg" {
 source = "github.com/GoogleCloudPlatform/gke-autoneg-controller//terraform/gcp?ref=v1.0.0"

 project_id = data.google_project.project.project_id

 workload_identity = {
   namespace       = "autoneg-system"
   service_account = "autoneg-controller-manager"
 }
}

// This resource will deploy Autoneg into your cluster
resource "helm_release" "autoneg" {
 name       = "autoneg"
 chart      = "autoneg-controller-manager"
 repository = "https://googlecloudplatform.github.io/gke-autoneg-controller/"
 namespace  = "autoneg-system"

 create_namespace = true

 set {
   name  = "createNamespace"
   value = false
 }

 set {
   name  = "serviceAccount.annotations.iam\\.gke\\.io/gcp-service-account"
   value = module.autoneg.service_account_email
 }

 set {
   name  = "serviceAccount.automountServiceAccountToken"
   value = true
 }
}
2. Run Terraform Plan & Terraform Apply
3. Verify Deployment
When Terraform apply has run successfully, you should be able to see a single controller manager pod in the autoneg-system namespace. You can run the following command to verify
kubectl get pods -n autoneg-system
Creating Global External Application LoadBalancer Resources
Next we will create the resources that make up a Google Cloud LoadBalancer; each resource has been explained by comments in the code. I have purposely put blue/green backends to show how it would work with separate clusters.
1. Store this code inside a file named external-alb.tf
locals {
 external_dns_domain = trimsuffix(data.google_dns_managed_zone.managed_zone_external.dns_name, ".")
}

//Create Health Check to ensure the service is healthy
resource "google_compute_health_check" "frontend_external" {
 name        = "frontend-external"
 description = "frontend-external"

 timeout_sec         = 10
 check_interval_sec  = 60
 healthy_threshold   = 4
 unhealthy_threshold = 5

 http_health_check {
   port_specification = "USE_SERVING_PORT"
   request_path       = "/_healthz"
 }
}

//Create our Blue Backend Service for Blue
resource "google_compute_backend_service" "blue_external" {
 project               = var.project_id
 name                  = "blue-external"
 load_balancing_scheme = "EXTERNAL_MANAGED"
 health_checks         = [google_compute_health_check.frontend_external.id]
 lifecycle {
   ignore_changes = [backend]
 }
}

//Create our Blue Backend Service for Green
resource "google_compute_backend_service" "green_external" {
 project               = var.project_id
 name                  = "green-external"
 load_balancing_scheme = "EXTERNAL_MANAGED"
 health_checks         = [google_compute_health_check.frontend_external.id]
 lifecycle {
   ignore_changes = [backend]
 }
}

// Global External LoadBalancers only support Classic SSL Certificates
// This means Wildcards are not supported
// This means you have to create a resource for each ingress point
resource "google_compute_managed_ssl_certificate" "external_ssl_cert" {
 name = "external-ssl-cert"

 managed {
   domains = [local.external_dns_domain]
 }
}

resource "google_compute_managed_ssl_certificate" "color_external" {
 for_each = toset(["blue", "green"])
 name     = "${each.value}-external-cert"

 managed {
   domains = ["${each.value}.${local.external_dns_domain}"]
 }
}

// Use google_compute_target_http_proxy if you don't require SSL
// This will form the frontend of our loadbalancer
resource "google_compute_target_https_proxy" "external_global_https_proxy" {
 name    = "external-global-target-proxy"
 url_map = google_compute_url_map.external_global_http_url_map.id
 ssl_certificates = [
   google_compute_managed_ssl_certificate.external_ssl_cert.id,
   google_compute_managed_ssl_certificate.color_external["blue"].id,
   google_compute_managed_ssl_certificate.color_external["green"].id
 ]
}

// Create Google Compute URL Map
// This will be used on the LoadBalancer to determine routing
resource "google_compute_url_map" "external_global_http_url_map" {
 name            = "external"
 description     = "external"
 default_service = google_compute_backend_service.blue_external.name

 host_rule {
   hosts        = [local.external_dns_domain]
   path_matcher = "blue"
 }

 host_rule {
   hosts        = ["blue-${local.external_dns_domain}"]
   path_matcher = "blue"
 }

 host_rule {
   hosts        = ["green-${local.external_dns_domain}"]
   path_matcher = "green"
 }

 path_matcher {
   name            = "blue"
   default_service = google_compute_backend_service.blue_external.id
 }
 path_matcher {
   name            = "green"
   default_service = google_compute_backend_service.blue_external.id
 }
}

// Create Static IP Address
resource "google_compute_global_address" "ip_address_external" {
 name = "external-address"
}

//Creating Forwarding Rule
// This will form the Google LoadBalancer its-self
resource "google_compute_global_forwarding_rule" "external_global_http_forwarding_rule" {
 name                  = "external-lb"
 ip_protocol           = "TCP"
 load_balancing_scheme = "EXTERNAL_MANAGED"
 ip_address            = google_compute_global_address.ip_address_external.address
 port_range            = "443"
 target                = google_compute_target_https_proxy.external_global_https_proxy.id
}

//Create Firewall Rule to allow GCP Probes to Access our Health Checks
resource "google_compute_firewall" "external-lb-hc" {
 name        = "external-allow-lb-health-check"
 network     = module.vpc.network_name
 target_tags = ["allow-health-checks"]
 source_ranges = [
   "130.211.0.0/22",
   "35.191.0.0/16"
 ]
 allow {
   protocol = "tcp"
   ports    = ["80", "8080"]
 }
}

#
# DNS Resources
#

data "google_dns_managed_zone" "managed_zone_external" {
 name = var.dns_external_domain_name
}

resource "google_dns_record_set" "external" {
 managed_zone = data.google_dns_managed_zone.managed_zone_external.name
 name         = data.google_dns_managed_zone.managed_zone_external.dns_name
 rrdatas      = [google_compute_global_address.ip_address_external.address]
 type         = "A"
}

resource "google_dns_record_set" "wildcard_external" {
 managed_zone = data.google_dns_managed_zone.managed_zone_external.name
 name         = "*.${data.google_dns_managed_zone.managed_zone_external.dns_name}"
 rrdatas      = [google_compute_global_address.ip_address_external.address]
 type         = "A"
}
2. Run Terraform Plan/Apply
This will allow us to access the LoadBalancer on the top level domain and any *. Domain, allowing us to visit blue.* and / or green.* etc.
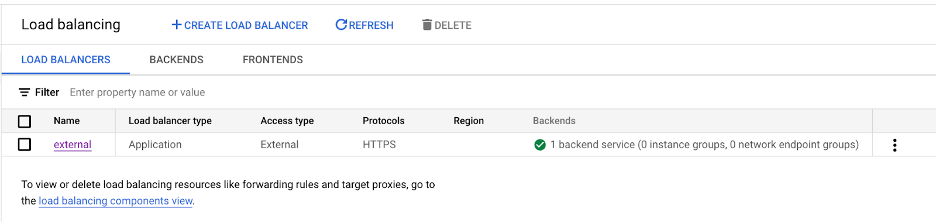
3. Verify in the Google console that you can see your new shiny LoadBalancer, you should be able to see:
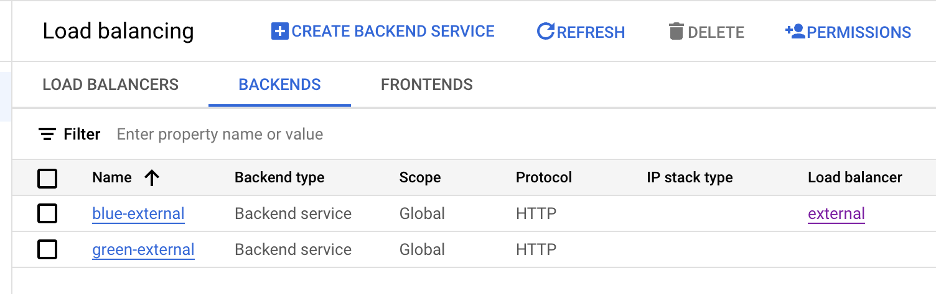
4. If you go to backends https://console.cloud.google.com/net-services/loadbalancing/list/backends you should be able to see two backends
5. If you browse to SSL Certificates https://console.cloud.google.com/security/ccm/list/lbCertificates you should be able to see three SSL Certificates, these can sometimes take a while to provision.
Note: if your DNS setup in Google is not correctly configured, your SSL Cert may fail to provision
6. If we view one of our backends e.g. Blue, you can see that we have no backends configured.
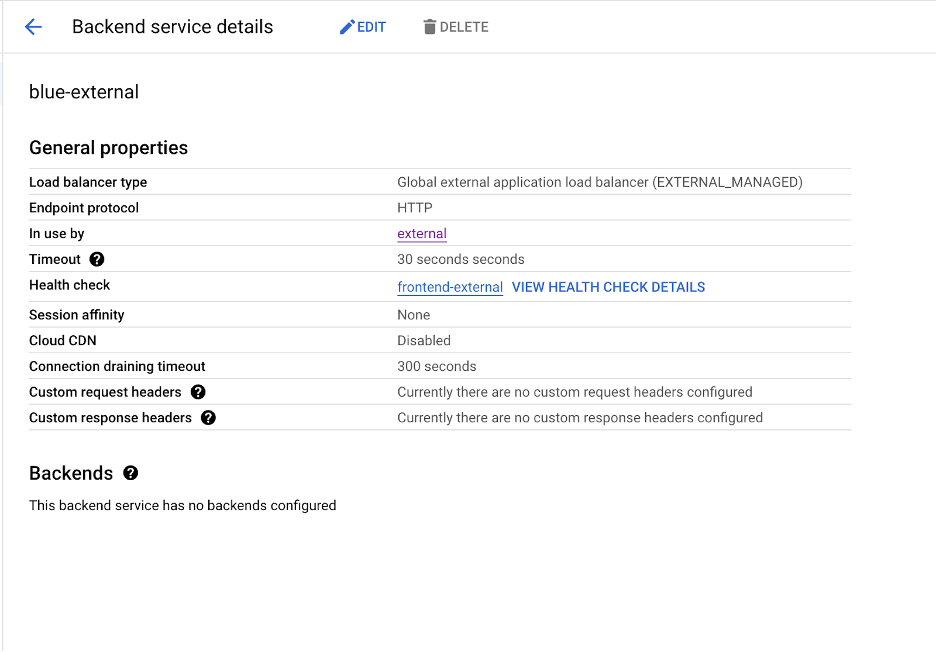
7. Since we have no backends, accessing our endpoint will fail with the following error no healthy upstream
Creating Cross Regional Internal Application LoadBalancer Resources
If you need to create an Internal LoadBalancer so that you can access services over VPN for example you need the following Terraform code as opposed to the above. Store this code inside a file named internal-alb.tf. You can follow all other steps outlined above.
locals {
 internal_dns_domain = trimsuffix(data.google_dns_managed_zone.managed_zone_internal.dns_name, ".")
}

//Create Health Check to ensure the service is healthy
resource "google_compute_health_check" "frontend_internal" {
 name        = "frontend-internal"
 description = "frontend-internal"

 timeout_sec         = 10
 check_interval_sec  = 60
 healthy_threshold   = 4
 unhealthy_threshold = 5

 http_health_check {
   port_specification = "USE_SERVING_PORT"
   request_path       = "/_healthz"
 }
}

//Create our Blue Backend Service for Blue
resource "google_compute_backend_service" "blue_internal" {
 project               = var.project_id
 name                  = "blue-internal"
 load_balancing_scheme = "INTERNAL_MANAGED"
 health_checks         = [google_compute_health_check.frontend_internal.id]
 lifecycle {
   ignore_changes = [backend]
 }
}

//Create our Blue Backend Service for Green
resource "google_compute_backend_service" "green_internal" {
 project               = var.project_id
 name                  = "green-internal"
 load_balancing_scheme = "INTERNAL_MANAGED"
 health_checks         = [google_compute_health_check.frontend_internal.id]
 lifecycle {
   ignore_changes = [backend]
 }
}

//Create DNS Authorization
// You only need this if your cert will be wildcards
resource "google_certificate_manager_dns_authorization" "internal_dns_auth" {
 name        = "dns-auth"
 description = "DNS"
 domain      = local.internal_dns_domain
}

//We can use Google New Certificates for Internal LoadBalancers
resource "google_certificate_manager_certificate" "internal_certificate" {
 name        = "internal-cert"
 description = "Internal Domain certificate"
 scope       = "ALL_REGIONS"
 managed {
   domains = [
     google_certificate_manager_dns_authorization.internal_dns_auth.domain,
     "*.${google_certificate_manager_dns_authorization.internal_dns_auth.domain}",

   ]
   dns_authorizations = [
     google_certificate_manager_dns_authorization.internal_dns_auth.id,
   ]
 }
}

// Use google_compute_target_http_proxy if you don't require SSL
// This will form the frontend of our loadbalancer
resource "google_compute_target_https_proxy" "internal_global_https_proxy" {
 name                             = "internal-global-target-proxy"
 url_map                          = google_compute_url_map.internal_global_http_url_map.id
 certificate_manager_certificates = [google_certificate_manager_certificate.internal_certificate.id]
}

// Create Google Compute URL Map
// This will be used on the LoadBalancer to determine routing
resource "google_compute_url_map" "internal_global_http_url_map" {
 name            = "internal"
 description     = "internal"
 default_service = google_compute_backend_service.blue_internal.name

 host_rule {
   hosts        = [local.internal_dns_domain]
   path_matcher = "blue"
 }

 host_rule {
   hosts        = ["blue-${local.internal_dns_domain}"]
   path_matcher = "blue"
 }

 host_rule {
   hosts        = ["green-${local.internal_dns_domain}"]
   path_matcher = "green"
 }

 path_matcher {
   name            = "blue"
   default_service = google_compute_backend_service.blue_internal.id
 }
 path_matcher {
   name            = "green"
   default_service = google_compute_backend_service.blue_internal.id
 }
}

// Create Static IP Address
resource "google_compute_address" "ip_address_internal" {
 subnetwork   = module.vpc.subnets["europe-west2/subnet-01"].name
 address_type = "INTERNAL"
 name         = "internal-address"
}

// Creating Forwarding Rule
// This will form the Google LoadBalancer its-self
resource "google_compute_global_forwarding_rule" "internal_global_http_forwarding_rule" {
 name                  = "internal-lb"
 ip_protocol           = "TCP"
 load_balancing_scheme = "INTERNAL_MANAGED"
 ip_address            = google_compute_address.ip_address_internal.id
 port_range            = "443"
 network               = module.vpc.network_name
 target                = google_compute_target_https_proxy.internal_global_https_proxy.id
}

//Create Firewall Rule to allow GCP Probes to Access our Health Checks
resource "google_compute_firewall" "internal-lb-hc" {
 name        = "internal-allow-lb-health-check"
 network     = module.vpc.network_name
 target_tags = ["allow-health-checks"]
 source_ranges = [
   "130.211.0.0/22",
   "35.191.0.0/16"
 ]
 allow {
   protocol = "tcp"
   ports    = ["80", "8080"]
 }
}

#
# DNS Resources
#

data "google_dns_managed_zone" "managed_zone_internal" {
 name = var.dns_internal_domain_name
}

resource "google_dns_record_set" "internal" {
 managed_zone = data.google_dns_managed_zone.managed_zone_internal.name
 name         = data.google_dns_managed_zone.managed_zone_internal.dns_name
 rrdatas      = [google_compute_address.ip_address_internal.address]
 type         = "A"
}

resource "google_dns_record_set" "wildcard_internal" {
 managed_zone = data.google_dns_managed_zone.managed_zone_internal.name
 name         = "*.${data.google_dns_managed_zone.managed_zone_internal.dns_name}"
 rrdatas      = [google_compute_address.ip_address_internal.address]
 type         = "A"
}
The biggest difference between external and internal LoadBalancers is the
- Load Balancing Scheme
- INTERNAL_MANAGED is a Cross Regional Internal Application LoadBalancer
- EXTERNAL_MANAGED is a Global External Application LoadBalancer
- SSL Certificates
- Global External Application LoadBalancer still require classic SSL Certificates, However with Cross Regional Internal Application LoadBalancer you can use new style SSL Certificates
Note: To use Wildcard SSL Certs, you need to use a Cross Regional Application LoadBalancer. Google do not allow you to use Wildcard Certs on a Regional Application LoadBalancer.
Deploying our Application
I am using https://github.com/GoogleCloudPlatform/microservices-demo to test our changes, and editing where required, You can also find the YAML files in our Github Repository
You will need to add the following annotations to your service object
annotations:
 cloud.google.com/neg: '{"exposed_ports": {"80":{}}}'
 controller.autoneg.dev/neg: '{"backend_services":{"80":[{"name":"blue-external","max_rate_per_endpoint":100}]}}'
When you add this annotation to a service object, two things will happen
- Google will create you a Network Endpoint Group for each zone
- Autoneg will get the Network Endpoint Groups and attach them to the specified Backend Service
If all worked well you should see the following events on the service
| Normal | Attach | 2m30s | neg-controller | Attach 1 network endpoint(s) (NEG "k8s1-e01cc970-default-frontend-external-80-b68c752f" in zone "europe-west2-a") |
| Normal | Sync | 16m | autoneg-controller | Synced NEGs for "default/frontend-external" as backends to backend service "blue-external" (port 80) |
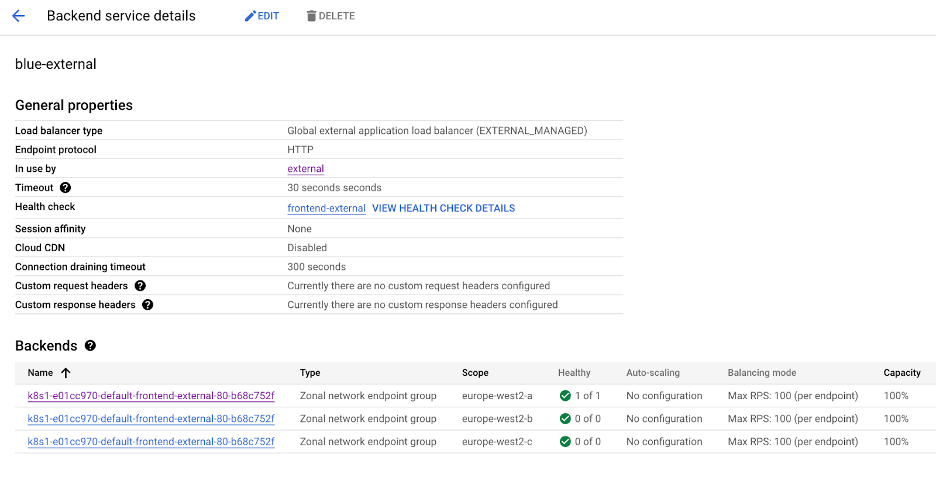
If you view the backend service on the Google Cloud Console you will be able to see each NEG and the number of healthy pods, e.g.
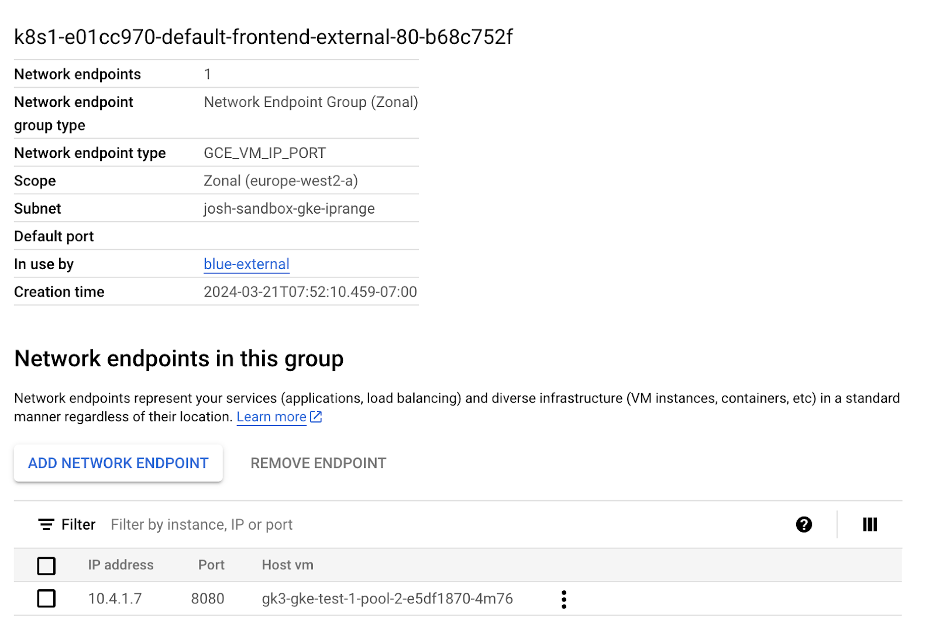
If you click onto the NEG, you should be able to see your Pod IP Address e.g.
If you deployed the Microservices Demo, browsing to one of your endpoints specified in the URL map should take you to the service e.g.
Note: It can take a while for your SSL Certificates to be provisioned by Google.

Summary
You should now have a good idea of how to do custom routing with GKE. There are alternatives available; Multi Cluster Ingress is one such alternative, however there are limitations with Multi Cluster Ingress, such as:
- Cannot use Multi Cluster Ingress with Internal LoadBalancers
- You will need to change your ingress object to MultiClusterIngress
You would need to weigh up the choice of either using Multi Cluster Ingress or the solution described above with AutoNEG.
Keep following our blog for more information. If you want to discuss any topics with an expert, please contact us.

Senior Solutions Engineer
Josh is a Solutions Engineer with a background in all things Cloud Native, Josh has been working with Kubernetes and other Cloud Native Technologies for 7 years and has a passion in all things tech, Josh’s original background is in Computer Networking. As well as this Josh is a keen gardener, and a very proud dad of one.