DevOps teams rely heavily on their CI/CD configuration tools to automate processes, accelerate delivery timelines and innovate at high velocity. Yet these platforms use, store and transmit lots of secrets to apply desired configurations, broker connections between various tools and also authorize access throughout the build and deployment process. Whether credentials, passwords, API keys or SSH keys, many secrets are exceptionally powerful, making them prime targets for external attackers or malicious insiders to facilitate attacks. Protecting development environments and digital supply chains begins with securely authenticating and controlling how DevOps tools, as well as applications, use secrets to access databases, cloud environments and other sensitive resources.
Configuring Servers Securely – and at Scale
Configuring servers by hand can by costly and error-prone, and as the number of servers that need to managed grows, this challenge compounds. Today, more than 40,000 companies use Puppet, one of the world’s leading configuration management platforms to simplify and automate this process. The platform allows developers and DevOps engineers to specify desired server configuration in modules that can be applied to change the state of any number of targeted servers. As they focus on strengthening the security of their development pipelines, many are looking for ways to integrate security best practices into their development projects without creating siloes or slowing down workflows.
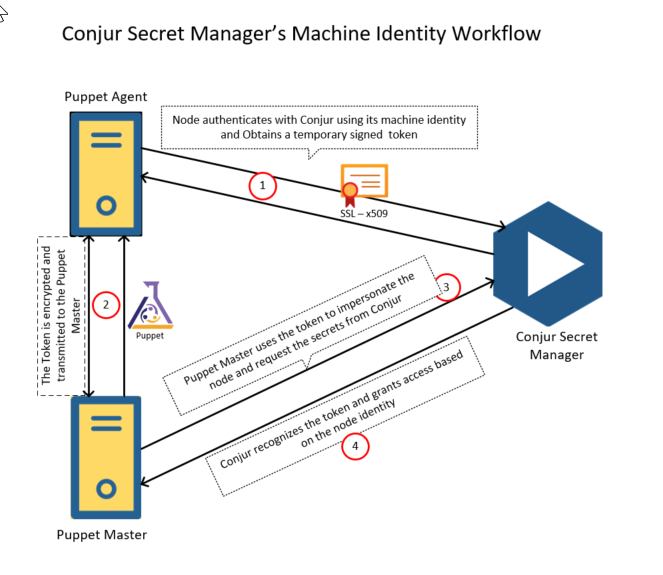
This post will explore an easy-to-use integration between Puppet and Conjur Secrets Manager Enterprise that provides security automation consisting of automated, enterprise-grade protection of secrets – all seamlessly integrated with Puppet’s configuration automation. The module simplifies the process of establishing a Conjur host identity. Additionally, secrets can be extracted from source control and the Puppet master, dramatically reducing the attack surface.
Prerequisites
Before taking the Puppet and Conjur integration for a test drive, here are a few things you will need. In my example, I have set up a CyberArk Conjur Secrets Manager Enterprise 12.0.0 standalone as a Docker container in my Azure environment.
Conjur Secrets Manager Enterprise configurations:
- Provision of an Ubuntu Machine
- Load Conjur Enterprise docker images after downloading them from the CyberArk Portal. If you are not currently a CyberArk customer, you can request a personalized demo here or try Conjur Secrets Manager Open Source
- Load Conjur CLI. I used docker image for the CLI, but ruby gem is another option
- Install and configure Conjur Enterprise and import certificate. I used a self-signed certificate with the help of open SSL
Puppet Enterprise configurations:
- Install Puppet master and two nodes (a Linux and a Windows node for this test). There are plenty of step-by-step guides available on the internet for this setup
- Copy the generated self-signed certificate to Puppet master and all the nodes for enabling SSL connection to the Conjur Enterprise Server
Integration Approaches
There are two integration approaches that can be taken:
1) Manifest-Provided Identity
2) Pre-Provisioned Identity
Regardless of approach, you’ll begin by installing the Conjur Enterprise Puppet module on the Puppet master server. For this exercise, I’ve installed the latest version 3.1.0 by executing the below command:
puppet module install cyberark-conjur
The below screenshot represents the Puppet admin UI, where I have highlighted the master and two node servers (Windows and Linux):

The below screenshot represents the outcome of docker ps command on Conjur Enterprise server, showing two running containers in docker engine (DAP and CLI):

Step 1: Create Required Policy
For the purposes of this demo, I have created a simple policy and uploaded it into Conjur Enterprise through CLI. These policies are written in a simple yml file, providing a way to organize the resources such as hosts, users and secrets in a logical way. This creates a secret and assigns required permissions to the host (node-01). This simple policy loads the command’s output as shown below:
Loaded policy 'dev/srv/nix'
{
  "created_roles": {
    "dev:host:dev/srv/nix/node-01": {
      "id": "dev:host:dev/srv/nix/node-01",
      "api_key": "3j0f7w4f8g2973akxeegpk5v4j3q0k5vd2q0q85r15hnrz83qd2a3n"
    }
  },
  "version": 1
}
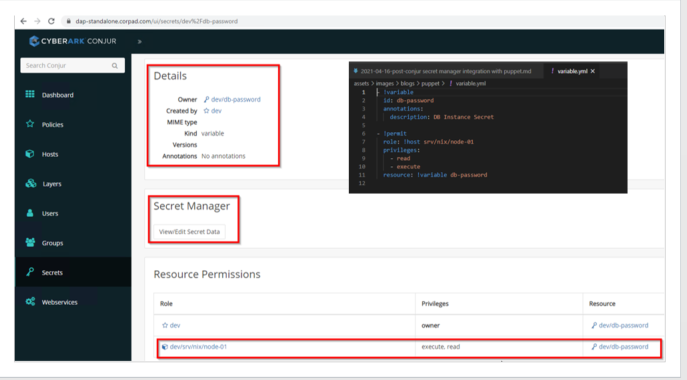
We can validate the above steps either via CLI or through Conjur Enterprise UI as follows:

Step 2: Define a Manifest File
Now I’m defining a manifest file (site.pp), which is located under /etc/puppetlabs/code/environments/production/manifests/ directory. The Pupppet’s Conjur module provides a conjur::secret deferred function that can be used to retrieve secrets from Conjur Enterprise. This manifest is very simple, but we need to make sure the self-signed certificate presents in the client nodes. In this example, I am simply writing the credentials in a file called secKey.txt.
node default {
}
node /^node-.*$/ {
$dbpass = Deferred(conjur::secret, ['dev/db-password', {
  appliance_url => "https://dap-standalone.corpad.com",
  account => "dev",
  authn_login => "host/dev/srv/nix/node-01",
  authn_api_key => Sensitive("3j0f7w4f8g2973akxeegpk5v4j3q0k5vd2q0q85r15hnrz83qd2a3n"),
  ssl_certificate => file("/certs/conjur.pem"),
}])
$dbpassword = Deferred(conjur::secret, ['dev/db-password'])
  file { '/tmp/logs/secKey.txt':
    ensure => file,
    content => Sensitive($dbpassword),
    mode => '0600'
  }
}
Step 3: Begin Communication via Puppet Agent
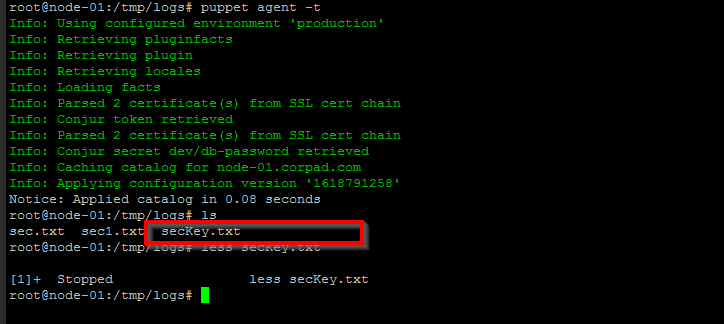
The Puppet agent starts (manually or automatically) an agent run and communicates with the Puppet server to get the catalog data. Now, I am executing the agent’s node manually using the below commands:
Puppet agent -t

Pre-Provisioned Identity (Linux Nodes) :
Step 1: Retrieve Secrets from Conjur Enterprise
In this approach, one line command is enough to retrieve the secrets from Conjur Enterprise and the below command should be defined in site.pp file:
$dbpassword = Deferred(conjur::secret, ['dev/db-password'])
To keep things simple, I’m writing the password into a file and Puppet manifest:
node default {
}
# Sample node with hardcode secret
node /^node-.*$/ {
$dbpassword = Deferred(conjur::secret, ['dev/db-password'])
  file { '/tmp/logs/secKeyFile.txt':
    ensure => file,
    content => Sensitive($dbpassword),
    mode => '0600'
  }
}
Step 2 : Configure Agent Node with Conjur Host Identity
Now the agent node (node-01) will be configured with Conjur host identity. Add the Conjur host and API key to Conjur identity files /etc/conjur.conf and /etc/conjur.identity.
conjur.conf
account: dev  // Conjur Account Name
plugins: []
appliance_url: https://dap-standalone.corpad.com  // Conjur URL
cert_file: "/certs/conjur.pem" // Certificate file : Read from the Puppet agent
conjur.identity
machine dap-standalone.corpad.com
login host/dev/srv/nix/node-01
password 3j0f7w4f8g2973akxeegpk5v4j3q0k5vd2q0q85r15hnrz83qd2a3n
Step 3: Begin Communication via Puppet Agent
The Puppet agent starts (manually or automatically) an agent run and communicates with the Puppet server to get the catalog data. In the following example, I am executing the agent’s node manually:

Summary
The Puppet and CyberArk Conjur Secrets Manager Open Source integration can be used to establish Conjur identity and then use that identity to fetch secrets from Conjur. By avoiding the need to encrypt secrets in source control, the workflow for managing secrets with Puppet is simpler and more intuitive. The Puppet master has only temporary access to the secrets it needs for catalog compilation. Meanwhile, Puppet users can increase their autonomy and stay focused on innovating — knowing Conjur will handle the heavy lifting for secrets management.
Benefits:
• Automate Puppet DevOps secret and credential workflows
• Abstract secrets from code
• Support encryption and full secret orations
• Enforce least privilege principles
• Provide a complete audit trail
The Conjur Puppet module is open source and available here:

Nirmalkumar Dhanaraj is an external community contributor and Identity and Access Management professional with diverse knowledge in Analysis, design, implementation of Identity Management and Identity Access Governance solutions for large Financial, Insurance, Energy and Educational Institutions across the world.

