
The first article in this series discussed the value of integrating Conjur with Jenkins. This article focuses on implementing Conjur with Jenkins. Then it reviews how to use Conjur Secrets in your pipelines.
We’ll need to have Jenkins and Conjur installed and running. We can begin with the home page open for both. This is important because Jenkins must make web calls to Conjur, so we need the URL for Conjur during integration. CyberArk’s documentation is here if we need to review it along the way. When we have completed the process, we’ll add a host and some secrets to Conjur, and then use them in a basic build and deploy pipeline.
There are four additional requirements for this tutorial:
- We need to have the Blue Ocean plugin installed to run pipelines.
- We need to have the Post build task plugin installed.
- We need to be registered with the OpenWeatherMap service to obtain an API key. The application that we’re building in this tutorial is a simple gateway to that service. We’ll use the “free tier” registration for this demonstration. The reason for utilizing this service is to show how to get an API key from Conjur and pass it to an external service. We can still build and install the application without registering, but the last step of the pipeline, which sends a request to OpenWeatherMap to verify the installation is working, will fail.
- There’s a required operation when uploading the WAR file to the EC2 instance. We must use SSH to move the file to the Tomcat “webapps” directory because the root user owns the webapps directory. We can avoid this by setting the access rights on the webapps directory to 777.
Integration
We’re following the process published here by CyberArk. There are a lot of steps, but each step has a clear purpose. Here’s a short overview:
- Install the Conjur plugin in Jenkins
- Create Conjur policies
- Define the host
- Define the secrets
- Allow the host to read the secrets
- Install the Conjur certificate in Java’s cacerts library
- Configure Jenkins’ login credential (so Conjur can authenticate it)
- Configure the Conjur appliance in Jenkins
- Create Jenkins credentials for Conjur secrets
All of this is “one-time infrastructure” work. It creates a secure connection between Jenkins and Conjur so that all your pipelines must do is bind Jenkins credentials to environment variables.
Here’s the way we’ll bind environment variables to Jenkins credentials in our example pipeline:
withCredentials([
conjurSecretCredential(credentialsId: 'GitHubUsername',
variable: 'GITHUB_USERNAME'),
conjurSecretCredential(credentialsId: 'GitHubPassword',
variable: 'GITHUB_PASSWORD')
                           ])
{
// process script here...
}
This is a spotless, simple interface in the pipeline for obtaining a secret. All the hard work is invisible behind the Jenkins credential. It’s also highly maintainable. We can change the source for a secret by changing the Jenkins credential or the Conjur policy, and the pipeline will never know about it.
Let’s start!
Installing the Conjur Plugin in Jenkins
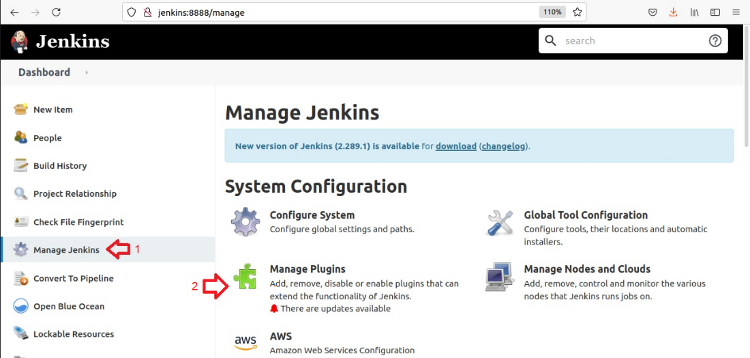
Install the plugin using the Jenkins Plugin Manager. On the Jenkins Dashboard, click Manage Jenkins. Then click Manage Plugins.
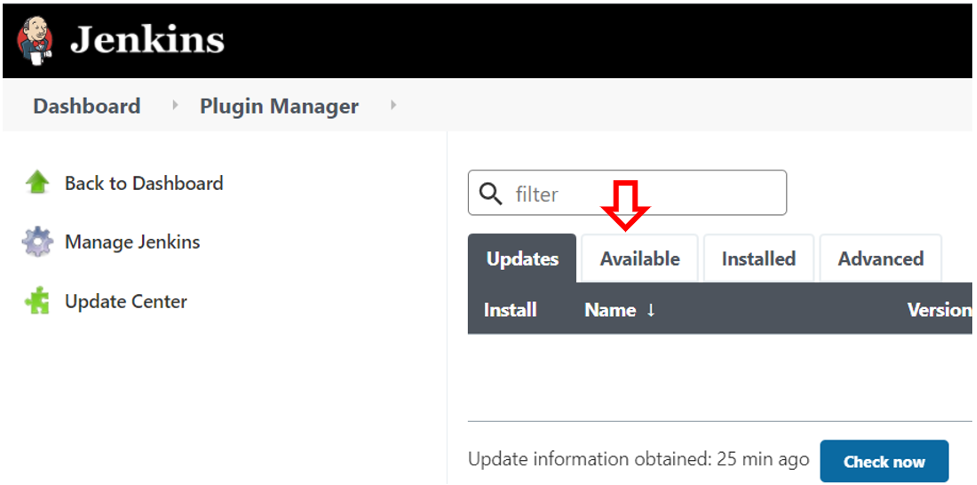
On the Plugin Manager page, click the Available tab.
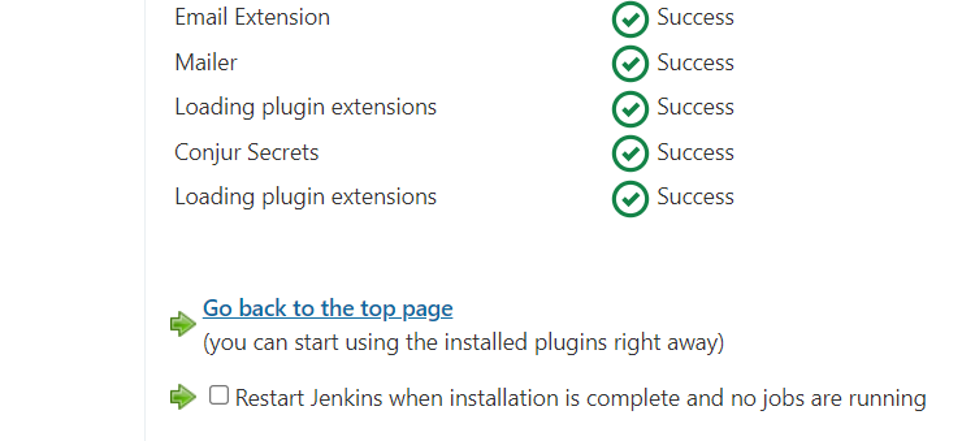
On the Available tab, type “conjur” into the search bar, select the Conjur Secrets plugin, then Install without restart.
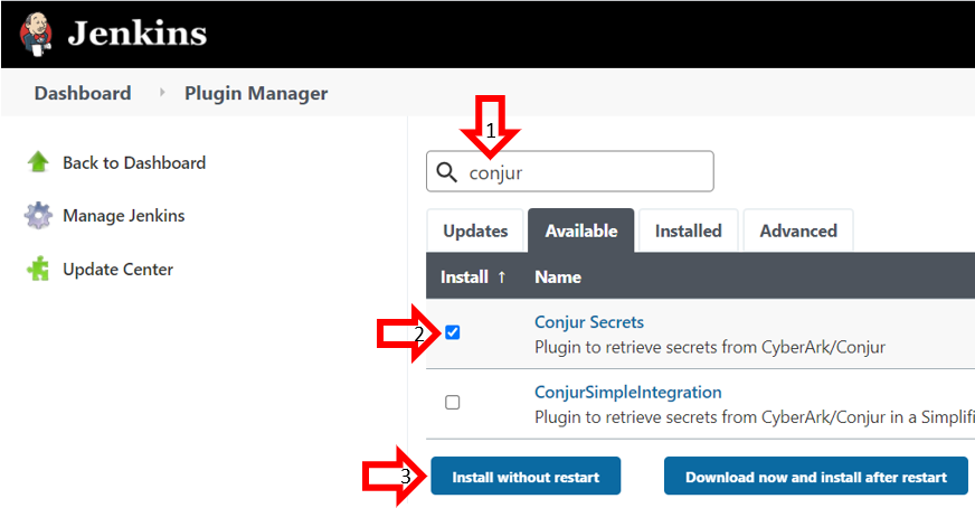
When the Install without restart button finishes, the Installing Plugins/Upgrades page opens. Once the Conjur Secrets plugin installation completes, click Go back to the top page.
Create Conjur Policies
Now that we have installed the plugin in Jenkins, we need to configure Conjur. We’re following the instructions provided here. We’re simplifying the example by creating a single file for the host policy and a single file for the variables instead of creating different branches for these policies.
Start by becoming the “root” user using “su” and then opening the Conjur client in a “bash” session as follows:
docker exec -it conjur_client /bin/bash
Create a policy that defines the Jenkins host in Conjur so that Conjur can authenticate Jenkins to obtain secrets. In this example, the Jenkins hostname is “jenkins.” Using a text editor, open a file and insert the following:
- !policy
  id: jenkins-frontend
  body:
  - !layer
  - !host jenkins

  - !grant
    role: !layer
    member: !host jenkins
Save the file with the name “jenkins_host.yml”.
The policy, named jenkins-frontend, creates a Conjur layer with the same name, and it creates a Conjur host named jenkins. The !grant section gives the jenkins host access to the jenkins-frontend layer.
Load this policy using the command:
conjur policy load root jenkins_host.yml
Unlike the example in the Conjur documentation, we’re loading this at the root user level since the policy creates the branch for us. After loading, Conjur displays the policy and the version as follows:
root@e4bccf3e1e63:/policy# conjur policy load root jenkins_host.yml
Loaded policy 'root'
{
"created_roles":
{
"myConjurAccount:host:jenkins-frontend/jenkins":
{
"id": "myConjurAccount:host:jenkins-frontend/jenkins",
"api_key": "1xx3b3z32ayd8p15j3cz83gtjce0bp0f0r1hf5wab3r1r9sh1e38zer"
}
},
"version": 1
}
Keep track of the api_key(Your key will be different) as Conjur uses it to authenticate Jenkins.
Next, we must create variables to hold the secrets. The following policy, named jenkins_secrets, creates them. Note that this just defines the storage locations. It doesn’t contain the values. We’ll set those up later.
- !policy
  id: jenkins_secrets

# Declare the secrets required by the application-
  body:
  - &variables
    - !variable github_username
    - !variable github_password
    - !variable aws_ec2_username
    - !variable aws_webserver_hostname
    - !variable aws_ec2_keyfile_path
    - !variable openweather_api_key

# Define a group and assign privileges for fetching the secrets-
  - !group secrets-users

  - !permit
    resource: *variables
    privileges: [ read, execute ]
    roles: !group secrets-users

# Entitlements that add the Jenkins layer of hosts to the group
   - !grant
    role: !group secrets-users
    member: !layer /jenkins-frontend
The policy creates a set of variables in the &variables section. Then it creates a group named secrets_users. The !permit section grants read and execute permissions to this group. Finally, it adds the secrets-users group to the jenkins-frontend layer defined earlier. Because the jenkins host is in this layer our Jenkins installation has access to these variables.
Load this policy using the command:
conjur policy load root variables.yml
After it loads, Conjur displays the following:
root@e4bccf3e1e63:/policy# conjur policy load root variables.yml
Loaded policy 'root'
{
"created_roles": {
},
"version": 2
}
Use the conjur list command to list all the resources just created. We need the full path for each of these resources to set values and define Jenkins credentials.
root@e4bccf3e1e63:/policy# conjur list
[
"myConjurAccount:policy:root",
"myConjurAccount:policy:jenkins-frontend",
"myConjurAccount:layer:jenkins-frontend",
"myConjurAccount:host:jenkins-frontend/jenkins",
"myConjurAccount:policy:jenkins_secrets",
"myConjurAccount:variable:jenkins_secrets/github_username",
"myConjurAccount:variable:jenkins_secrets/github_password",
"myConjurAccount:variable:jenkins_secrets/aws_ec2_username",
"myConjurAccount:variable:jenkins_secrets/aws_webserver_hostname",
"myConjurAccount:variable:jenkins_secrets/aws_ec2_keyfile_path",
"myConjurAccount:variable:jenkins_secrets/openweather_api_key",
"myConjurAccount:group:jenkins_secrets/secrets-users"
]
Use a Conjur command in this form to store values in the variables:
conjur variable values add <policy-path-of-variable-name> <secret-value>
In this example, use these commands:
conjur variable values add jenkins_secrets/github_username myLabGitHub
conjur variable values add jenkins_secrets/github_password <GitHub Token>
conjur variable values add jenkins_secrets/aws_ec2_username ec2-user
conjur variable values add jenkins_secrets/aws_webserver_hostname ec2-hostname
conjur variable values add jenkins_secrets/aws_ec2_keyfile_path /var/lib/jenkins/aws_personal_key.pem
conjur variable values add jenkins_secrets/openweather_api_key <your_key>
We put the AWS personal key file in the Jenkins home directory with /var/lib/jenkins so that Jenkins can read it.
Let’s take a moment to review the variables:
- github_username is the username required to authenticate to GitHub to clone the repository.
- github_password is the GitHub personal token.
- aws_ec2_username is the SSH/SCP username needed to upload the WAR file to the Tomcat host on AWS.
- aws_webserver_hostname is the AWS EC2 instance public hostname for the instance hosting Tomcat.
- aws_ec2_keyfile_path is the AWS private key associated with our account. AWS uses this to authenticate SSH/SCP.
- openweather_api_key is your registration key from OpenWeatherMap.
This completes the Conjur configuration.
Installing the Conjur SSL Certificate
Jenkins uses HTTPS to make API calls to Conjur, so we need to obtain Conjur’s certificate. In this example, Conjur and Jenkins are running on the same machine. But we should run these commands on the Jenkins host if we run them on separate devices (or in different containers).
If we have exposed the nginx_proxy, we know its IP address (or have a DNS hostname for it). We can execute this command to obtain the Conjur certificate. This server is running on localhost, but your server is likely to be on another machine.
openssl s_client -showcerts -connect localhost:443 < /dev/null 2> /dev/null | sed -ne '/-BEGIN CERTIFICATE-/,/-END CERTIFICATE-/p' > conjur_cert.pem
This is a “self-signed” certificate that we must import into the Java Keystore on the Jenkins host. We must tell keytool to trust it this way:
keytool -import -alias conjur -cacerts -file conjur_cert.pem
Configuring Jenkins’ Login Credential for Conjur
Now let’s give Jenkins the credentials it uses to connect to Conjur.
On the Dashboard, click Manage Jenkins.

Then click Manage Credentials.

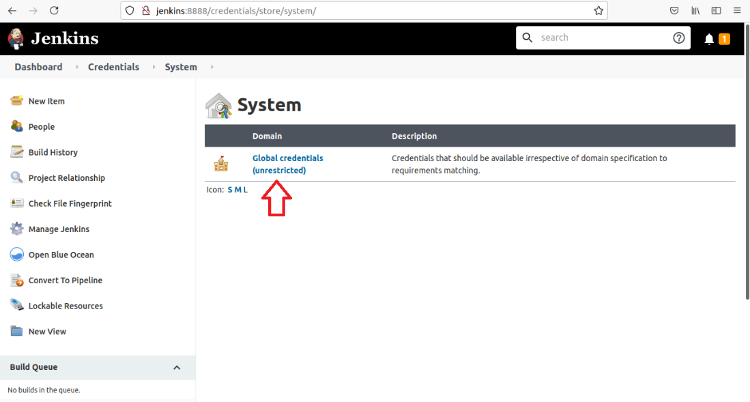
Under Stores Scoped to Jenkins, click Jenkins.

Finally, click Global Credentials.

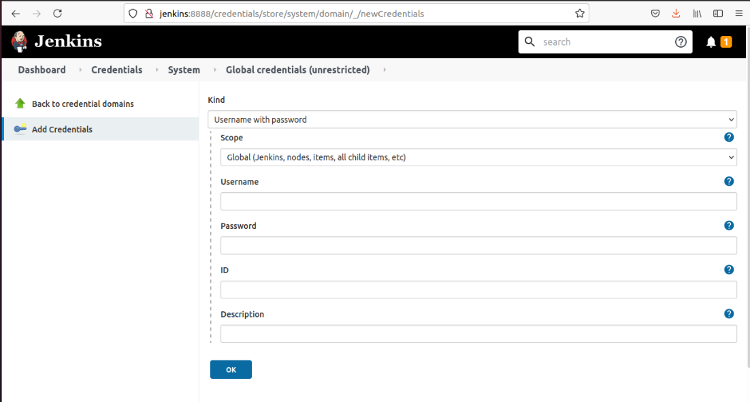
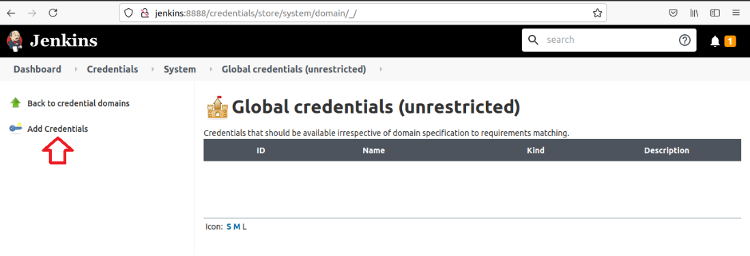
To create the credential, click Add Credentials.
Recall the response from Conjur when we loaded the jenkins_host.yml policy file:
root@e4bccf3e1e63:/policy# conjur policy load root jenkins_host.yml
Loaded policy 'root'
{
"created_roles":
{
"myConjurAccount:host:jenkins-frontend/jenkins":
{
"id": "myConjurAccount:host:jenkins-frontend/jenkins",
"api_key": "1xx3b3z32ayd8p15j3cz83gtjce0bp0f0r1hf5wab3r1r9sh1e38zer"
}
},
"version": 1
}
The Username comes from the id field and it is the concatenation of a host/ prefix and the full id path. The Password is the value of the api_key:
Username:  host/jenkins-frontend/jenkins
Password:  1xx3b3z32ayd8p15j3cz83gtjce0bp0f0r1hf5wab3r1r9sh1e38zer
Use this value for the ID JenkinsLoginToConjur. We use this to refer to this credential in the pipeline.
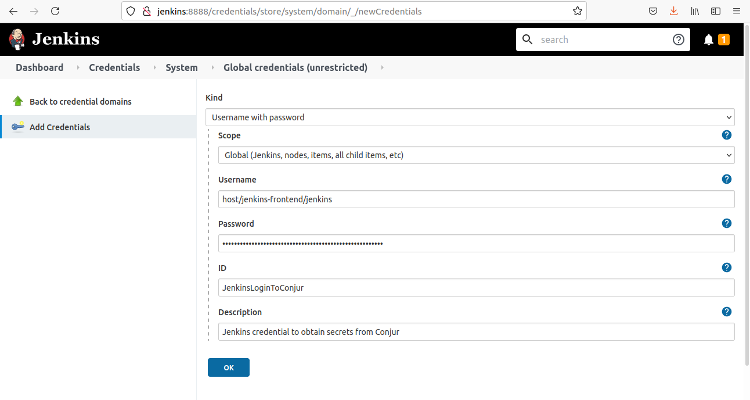
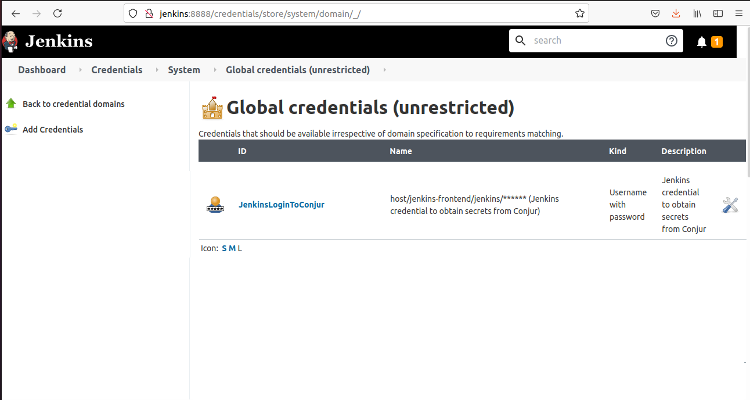
Click OK to create the credential and return to the previous page to see the new credential.
Configuring the Conjur Appliance in Jenkins
Now we can create a global configuration for the Conjur appliance to allow Jenkins to connect to Conjur to obtain secrets.
To add the Conjur configuration, click Manage Jenkins and Configure System.
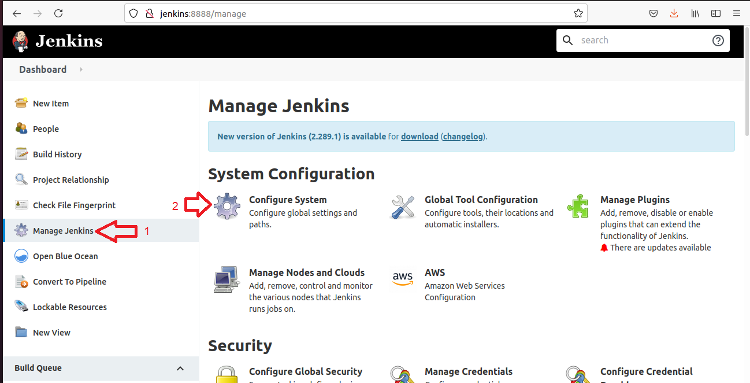
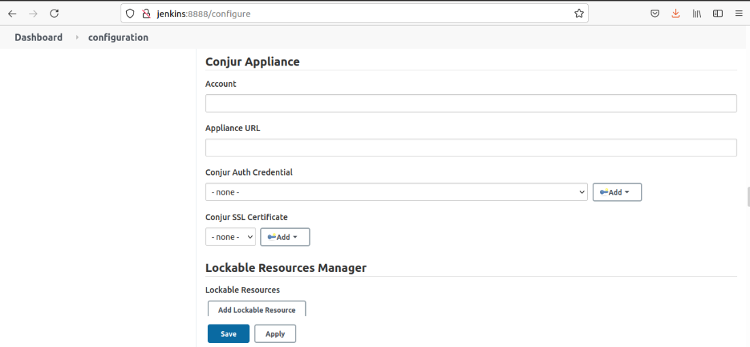
Scroll down to Conjur Appliance.
The Account value was determined when you configuring Conjur, but it’s visible in the text that Conjur returned when loading the jenkins_host.yml policy file. In this example, it’s the first element of the Jenkins host policy which is myConjurAccount.
Loaded policy 'root'
{
       "created_roles": {
            "myConjurAccount:host:jenkins-frontend/jenkins": {
                   "id": "myConjurAccount:host:jenkins-frontend/jenkins",
                   "api_key": "1xx3b3z32ayd8p15j3cz83gtjce0bp0f0r1hf5wab3r1r9sh1e38zer"
            }
       },
"version": 1
}
In the following dialog, enter the appliance URL that you used to obtain the certificate. We created the Conjur Auth Credential in the previous step to be able to select it in the drop-down menu. Because we imported the certificate using keytool, we can leave the Conjur SSL certificate variable set to none.
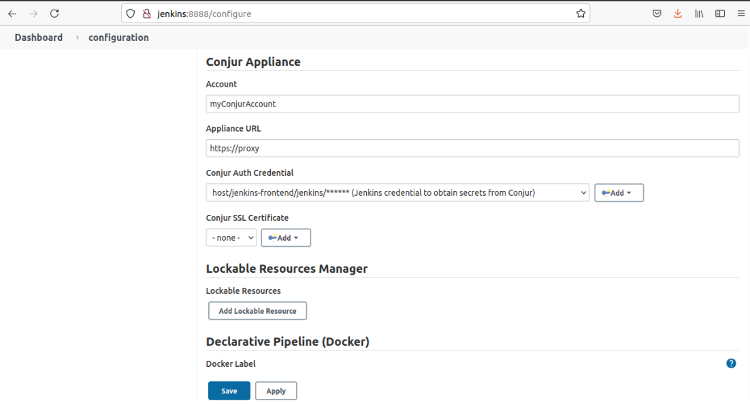
When you have filled in the form, click Save.
Creating Jenkins Credentials for Conjur Secrets
Now that Jenkins can connect to Conjur, we must map the Conjur secrets to Jenkins credentials so that we can use a credential in a pipeline.
Click Manage Jenkins, then Manage Credentials.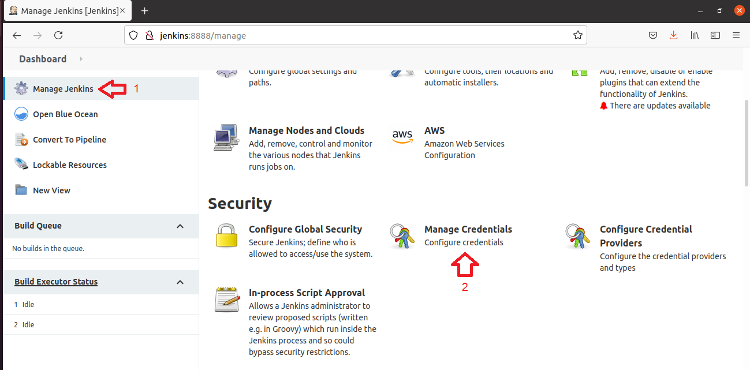
Click Stores Scoped to Jenkins – Jenkins/Global Credentials.
Finally, click Add Credentials.
In the new form, as shown below, set the Kind field to Conjur Secret Credential and fill in the remaining fields.
We’ve chosen a global scope so that any pipeline can check out code from GitHub. The variable path is the policy name and variable name that we used in the variables.yml policy file. The ID value is the name we use in the pipelines.
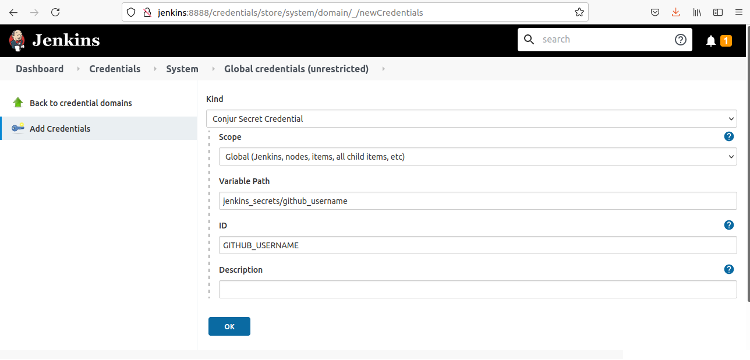
Click OK to save the form and return to the previous screen. Repeat this process to create credentials for the remaining five Conjur secrets.
Using the Credentials
We’ve done the hard work. We’ve integrated Jenkins and Conjur, and we can start using Conjur Secrets in our Jenkins pipelines. We’ll create a Scripted Pipeline and a freestyle project to demonstrate how to do this. We create a Scripted Pipeline first.
Creating a Scripted Pipeline
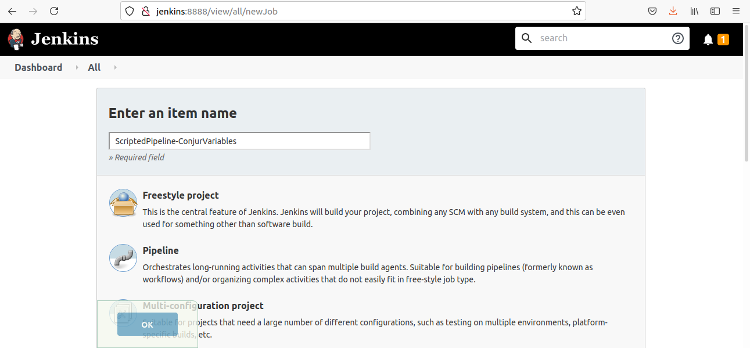
On the Jenkins Dashboard, click New Item.
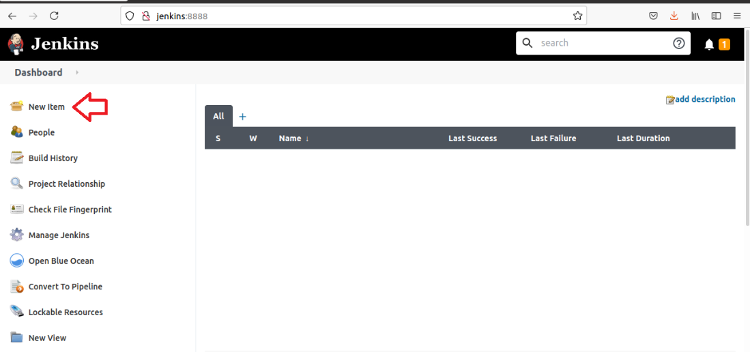
Enter a name for the pipeline, then click Pipeline and OK.
This takes us to the Pipeline Builder.
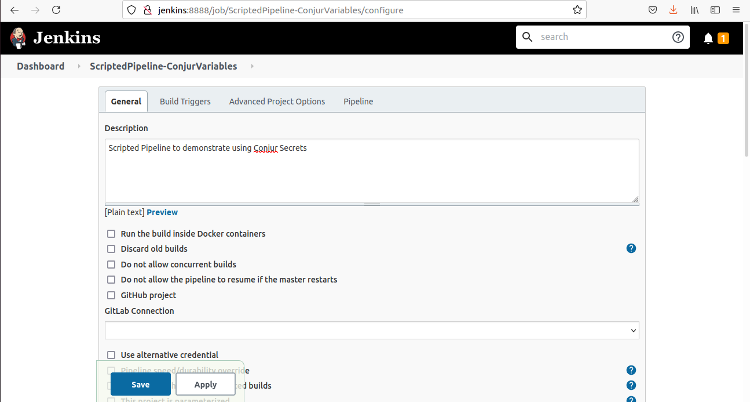
Jenkins has many features to build pipelines, but since this article is about using Conjur, we use a script for the entire process.
Click the Pipeline tab or scroll down to the Pipeline section.
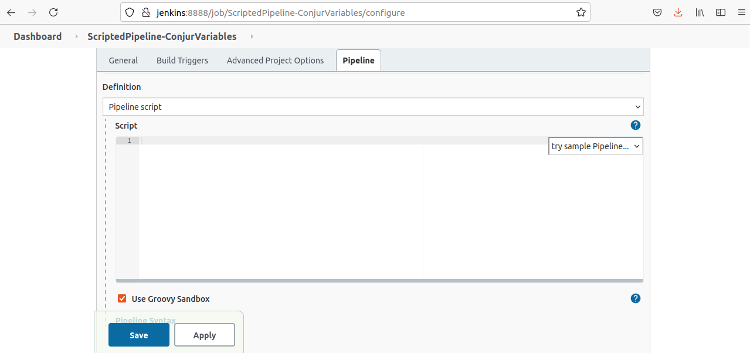
Clear the Use Groovy Sandbox checkbox and add the following script:
timestamps
{
node ()
{
stage ('Checkout')
{
withCredentials([
                            conjurSecretCredential(credentialsId: 'GitHubUsername',
variable: 'GITHUB_USERNAME'),
                            conjurSecretCredential(credentialsId: 'GitHubPassword',
variable: 'GITHUB_PASSWORD')
                           ])
{
echo 'Starting Checkout'
Try
{
echo 'Try to clone - may fail if a previous clone exists.'
sh 'git clone https://$GITHUB_USERNAME:[email protected]/myLabGitHub/OpenWeatherGatewayDemo'
}
catch(Exception e1)
{
echo 'Delete the exsting clone and retry'
sh 'rm -rf $WORKSPACE/OpenWeatherGatewayDemo'
sh 'git clone https://$GITHUB_USERNAME:[email protected]/myLabGitHub/OpenWeatherGatewayDemo'
}
}
}
stage ('Build')
{
// Maven build step
// withMaven {
if(isUnix()) {

sh "mvn -f OpenWeatherGatewayDemo/OpenWeatherGateway/pom.xml org.apache.maven.plugins:maven-compiler-plugin:compile "

} else {

bat "mvn -f OpenWeatherGatewayDemo/OpenWeatherGateway/pom.xml org.apache.maven.plugins:maven-compiler-plugin:compile "
}
}
stage ('Package')
{
// Maven build step
// withMaven {
if(isUnix()) {
sh "mvn -f OpenWeatherGatewayDemo/OpenWeatherGateway/pom.xml org.apache.maven.plugins:maven-war-plugin:war "
} else {
bat "mvn -f OpenWeatherGatewayDemo/OpenWeatherGateway/pom.xml org.apache.maven.plugins:maven-war-plugin:war "
}
}
stage ('Deploy to Tomcat')
{
withCredentials([
conjurSecretCredential(
credentialsId: 'AWS_EC2_USERNAME',
variable: 'AWS_EC2_USERNAME'
),
conjurSecretCredential(
credentialsId: 'AWS_WEBSERVER_HOSTNAME',
variable: 'AWS_WEBSERVER_HOSTNAME'
),
conjurSecretCredential(
credentialsId: 'AWS_EC2_KEYFILE_PATH',
variable: 'AWS_EC2_KEYFILE_PATH'
),
conjurSecretCredential(
credentialsId: 'OPENWEATHER_API_KEY',
variable: 'OPENWEATHER_API_KEY')
                               ])
{
sh 'scp -v -o StrictHostKeyChecking=no -i $AWS_EC2_KEYFILE_PATH $WORKSPACE/OpenWeatherGatewayDemo/OpenWeatherGateway/target/OpenWeatherGateway.war $AWS_EC2_USERNAME@$AWS_WEBSERVER_HOSTNAME:OpenWeatherGateway.war'

sh 'ssh -i $AWS_EC2_KEYFILE_PATH $AWS_EC2_USERNAME@$AWS_WEBSERVER_HOSTNAME sudo mv OpenWeatherGateway.war /opt/tomcat/tomcat/webapps'
}
}
stage('Validate Deployment')
{
withCredentials([
conjurSecretCredential(
credentialsId: 'AWS_WEBSERVER_HOSTNAME',
variable: 'AWS_WEBSERVER_HOSTNAME'
),
conjurSecretCredential(
credentialsId: 'OPENWEATHER_API_KEY',
variable: 'OPENWEATHER_API_KEY'
)
])
{
sh "curl -v 'http://'$AWS_WEBSERVER_HOSTNAME':8080/OpenWeatherGateway/Weather?city=Birdsboro,PA,USA&api='$OPENWEATHER_API_KEY"
}
}
}
}
There are five stages in the pipeline:
- Checkout
- Build
- Package
- Deploy to Tomcat
- Validate Deployment
The Checkout, Deploy to Tomcat, and Validate Deployment stages use the withCredentials block to bind Conjur secrets to environment variables. The Checkout stage is built with a try/catch block to handle cases where the repository was cloned previously.
Click Save when we finish completing the pipeline.
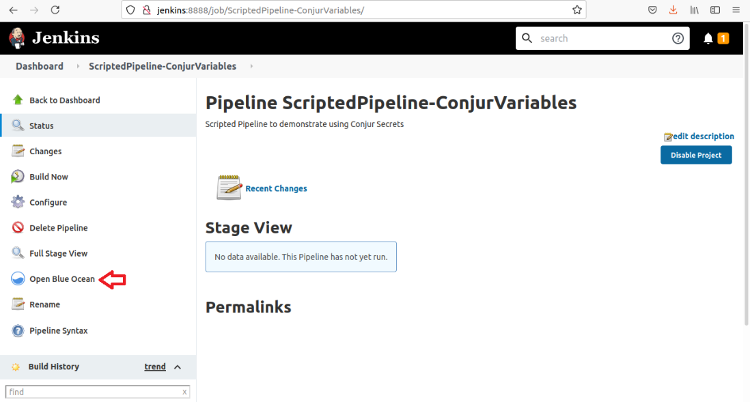
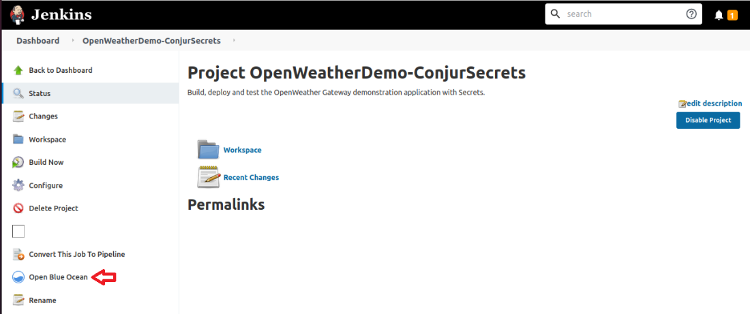
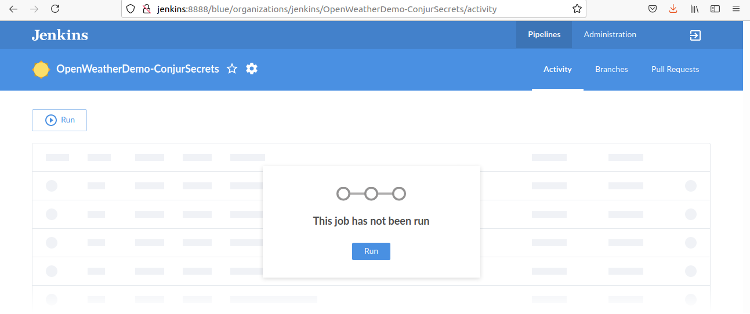
We run the pipeline using Blue Ocean, so click Open Blue Ocean. Since this is a new pipeline, Blue Ocean tells us the pipeline has run. Click Run to run it.

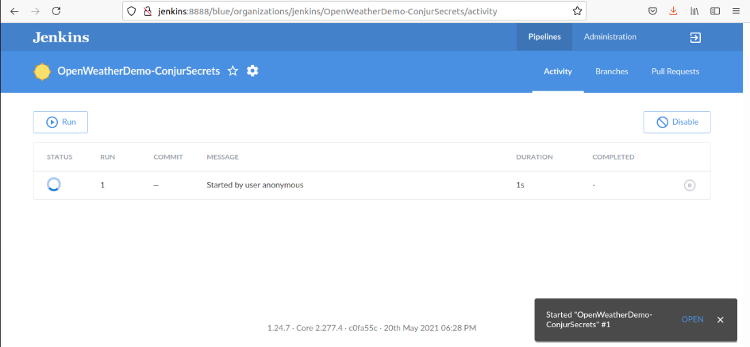
Jenkins queues the request. Note the popup dialog in the lower right corner. This is a convenience dialog that disappears after about 10 seconds.

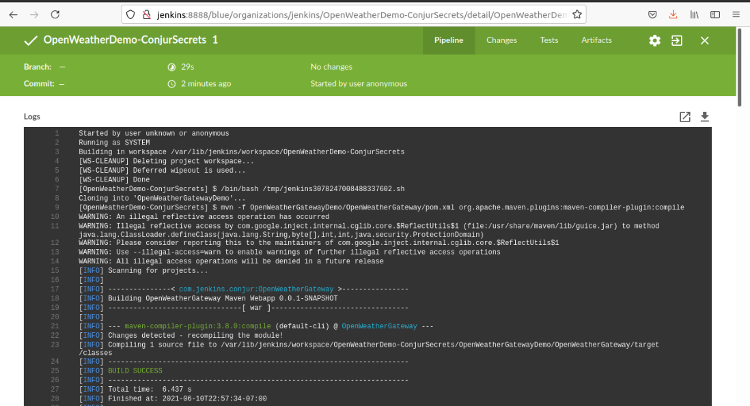
When we click the OPEN link, we see the pipeline’s progress:
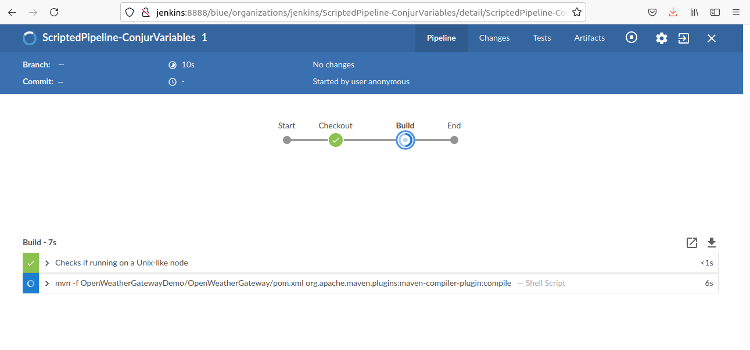
When the pipeline finishes, we see this page:
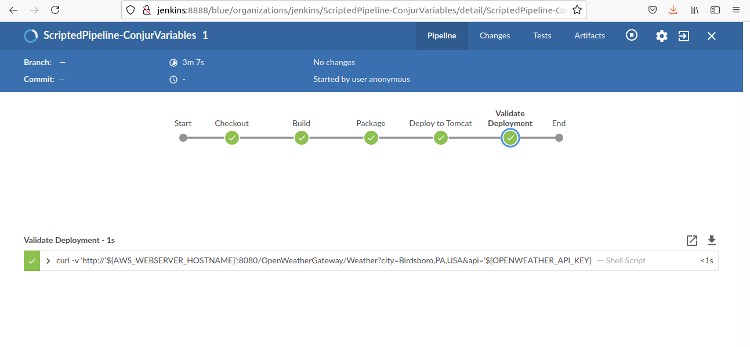
We can click on any stage to see the portion of the log file associated with that stage.
Freestyle Projects
Jenkins freestyle projects replace code with configuration dialogs to take care of some developing pipelines’ mechanics. In this example, we’ll show how to bind Conjur secrets to environment variables that we can use throughout the scripts in our freestyle project.
We’re going to reimplement the same process that we created in the scripted pipeline process. We’ll need to create bindings for the six Conjur secrets we made as part of that process.
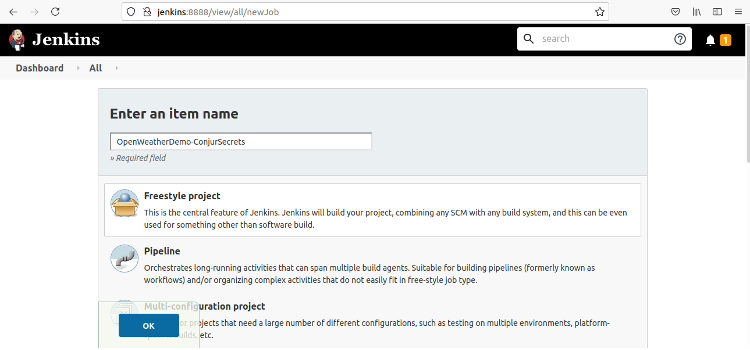
First, we must create our freestyle project from the Jenkins Dashboard by clicking Manage Jenkins and then clicking New Item.

This takes us to the New Item page, where we can provide the project name and set the project type by clicking Freestyle project and then clicking OK.
Configure the Build Environment and Create Bindings
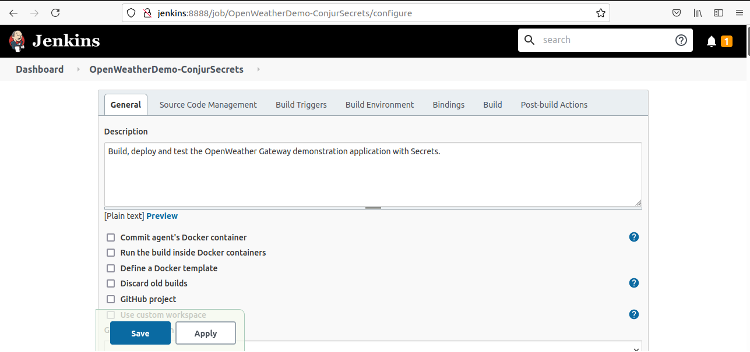
The build screen is long, so the following screenshots only show the parts we’re filling in.
First, provide a description.
Scroll down to the Build Environment, where we can see the Use secret text(s) or file(s) checkbox. Next, use Bindings to bind Conjur Secrets to shell environment variables that we can use in scripts.
The credentials that we defined earlier provided Jenkins with all the information it needs to fetch the value of the secret from Conjur, so all we need to do here is tell Jenkins which secret maps to which environment variable.
Finally, we use the withCredentials section to provide the same binding in the scripted pipeline.
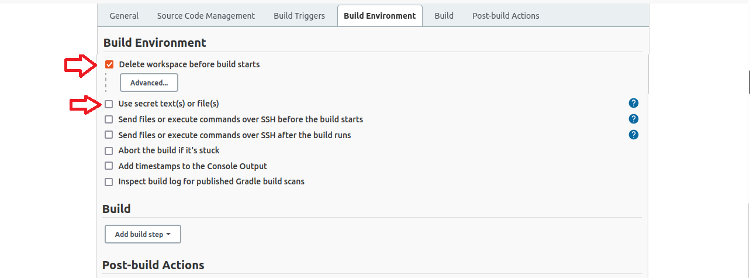
Click the Delete workspace before build starts checkbox to clear the workspace so we can use the GitHub clone operation to obtain our application code from GitHub. If we don’t do this, the clone operation will work once, but it’ll fail afterward because the workspace isn’t empty.
Continue the process of creating our bindings by clicking the Use secret text(s) or file(s) checkbox to expose the Bindings section and the related Add button.
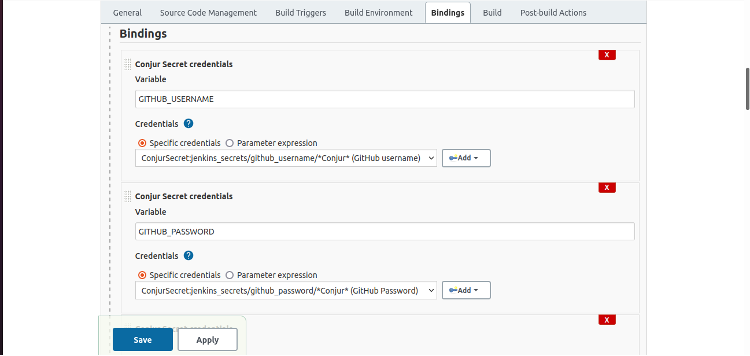
Here are the steps to create the first binding. We must repeat the following steps for all six bindings.
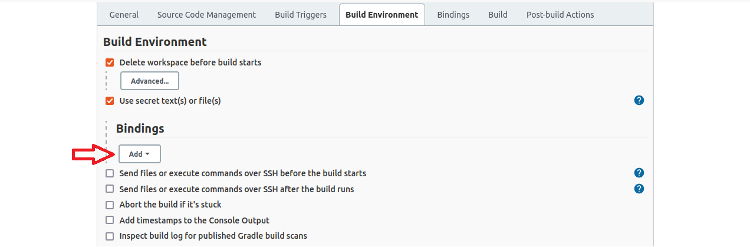
Then click Add to open the Binding type drop-down list.
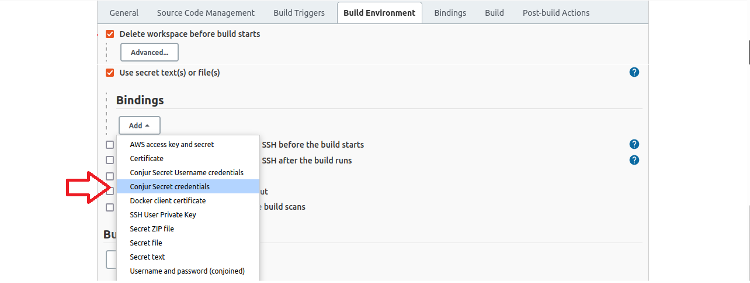
Select Conjur Secret credentials to display the Conjur Secret credentials binding dialog.
First, set the variable to set the environment variable’s name and select the Jenkins credential that contains the Conjur Secret path created previously. We use this type for all bindings.
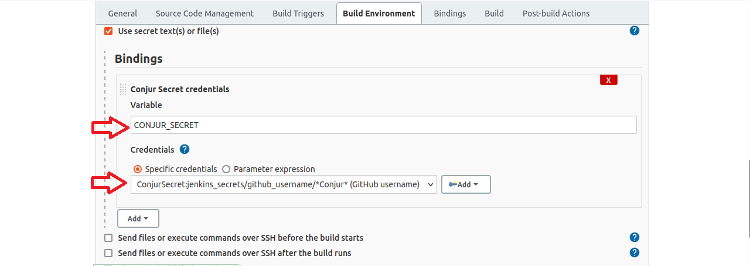
Here’s the final definition of the GITHUB_USERNAME binding. We must repeat this process for each of the five remaining bindings.
We’re skipping the steps, but we’ve included the definition of the GITHUB_PASSWORD binding below:
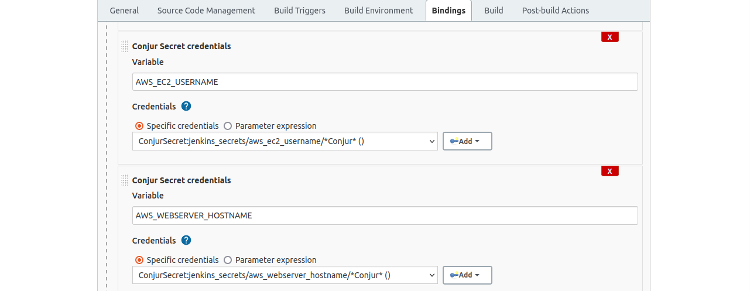
Here are the definitions for the AWS_EC2_USERNAME and AWS_WEBSERVER_HOSTNAME:
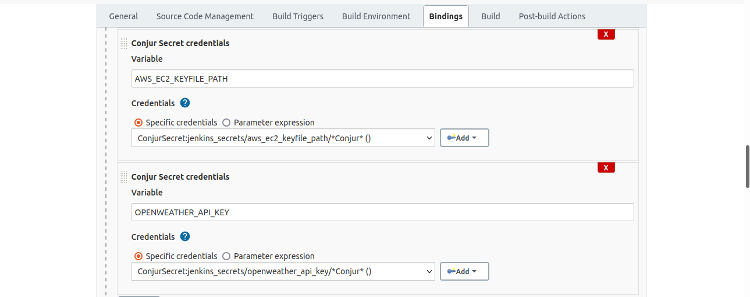
And here are the definitions of the AWS_EC2_KEYFILE_PATH and OPENWEATHER_API_KEY bindings.
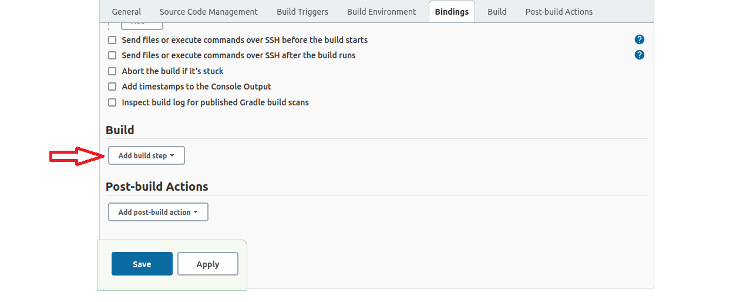
Adding Build Steps
Now we can add the three Build steps: the first step clones the repository and then the two Maven steps that build the project and create the WAR file.
Cloning the Repository
Scroll down to the Build section and click Add build step.
We use a shell script to clone the repository, so select Execute shell.
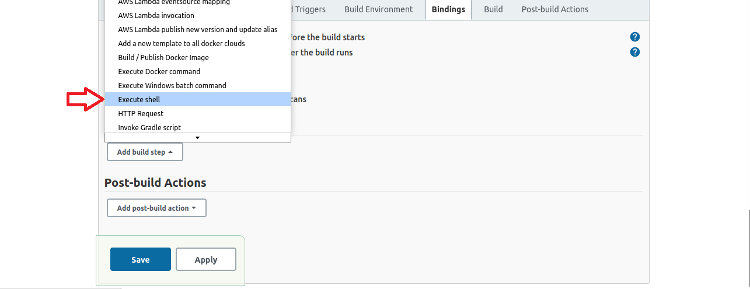
Then insert the shell script.
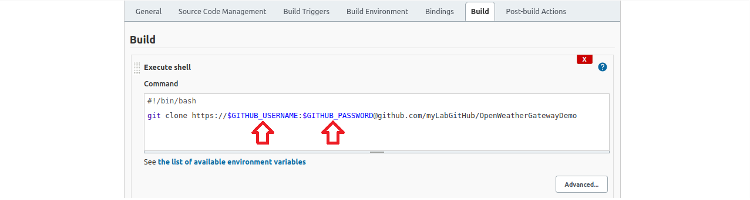
The complete script is:
#!/bin/bash

git clone https://$GITHUB_USERNAME:[email protected]/myLabGitHub/OpenWeatherGatewayDemo
We can see the two environment variables, GITUB_USERNAME and GITHUB_PASSWORD, that we created using bindings in the code.
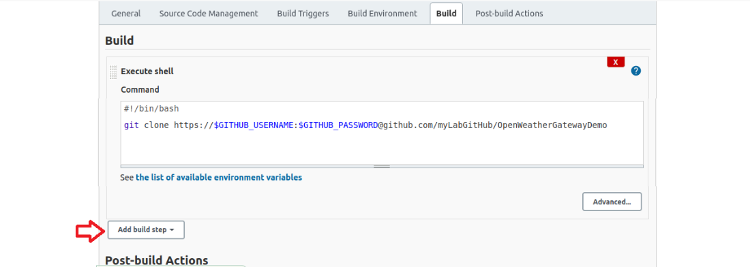
Adding Maven Build Steps
Let’s add the two Maven build steps.
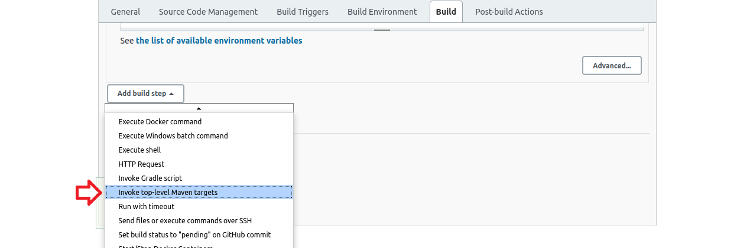
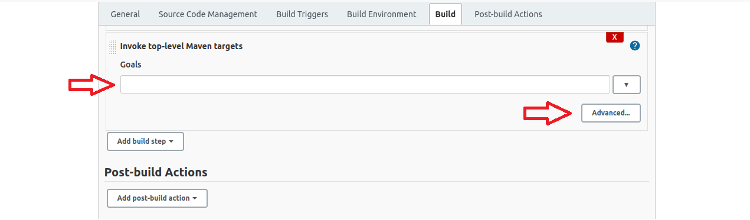
Click Add build step to show the drop-down list.
Then select the Invoke top-level Maven targets step type to display the Maven configuration dialog box.
Now, we are going to set the target and some advanced options.
Fill in the page as shown below to compile the application code. There are other advanced options, but set only the values shown below:
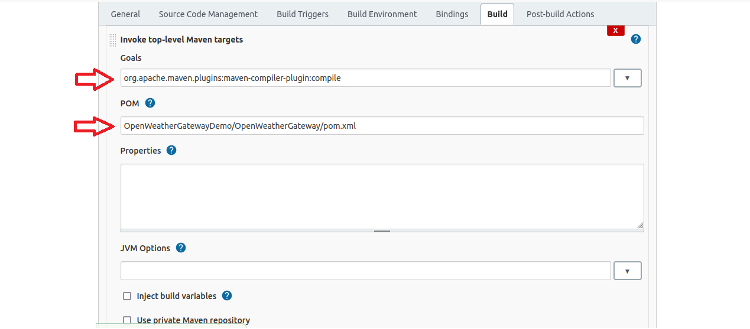
Goal: org.apache.maven.plugins:maven-compiler-plugin:compile
POM: OpenWeatherGatewayDemo/OpenWeatherGateway/pom.xml
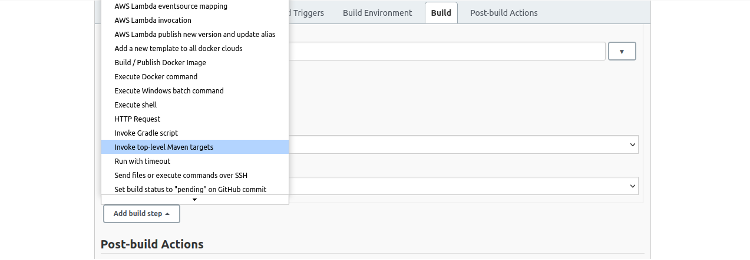
When we have completed the previous step, we’ll scroll down and click Add build step. Then select Invoke top-level Maven targets again.
Fill in the two fields shown below to package the application into a WAR file:
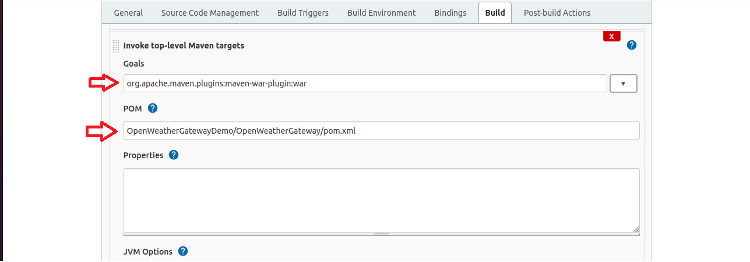
In the Goals field, specify: org.apache.maven.plugins:maven-war-plugin:war
In the POM field, specify: OpenWeatherGatewayDemo/OpenWeatherGateway/pom.xml
Adding Post-build Steps
The Post-build Actions deploy the code to Tomcat and call the application to verify that it works.
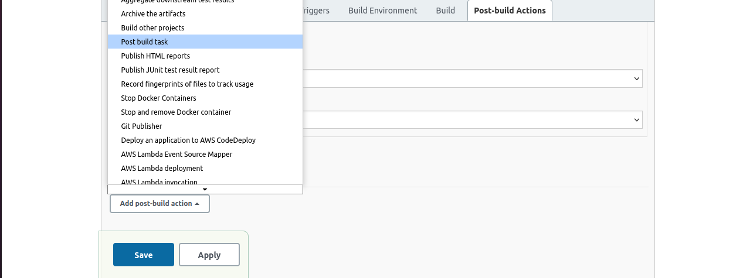
Scroll down to the Post-build Actions section and click Add post-build action.
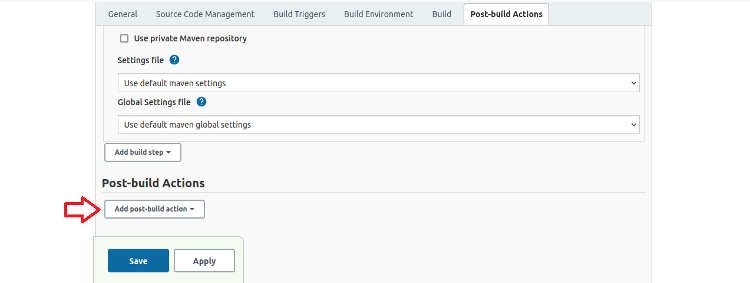
Select the Post-build task type to display the Post build task page.
Fill in the fields as shown in the screenshot below:
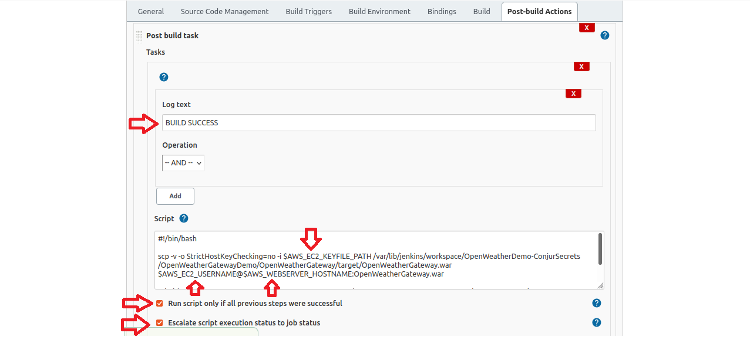
The complete script is:
#!/bin/bash
scp -v -o StrictHostKeyChecking=no -i $AWS_EC2_KEYFILE_PATH /var/lib/jenkins/workspace/OpenWeatherDemo-ConjurSecrets/OpenWeatherGatewayDemo/OpenWeatherGateway/target/OpenWeatherGateway.war $AWS_EC2_USERNAME@$AWS_WEBSERVER_HOSTNAME:OpenWeatherGateway.war

ssh -i $AWS_EC2_KEYFILE_PATH $AWS_EC2_USERNAME@$AWS_WEBSERVER_HOSTNAME sudo mv OpenWeatherGateway.war /opt/tomcat/tomcat/webapps
The script uses SCP to push the WAR file to the AWS EC2 instance and uses SSH to copy the WAR file to the webapps directory of the Tomcat server. Tomcat deploys the WAR file when it’s changed.
As shown in the screenshot, the script references three of the environment variables bound to Conjur Secrets:
- AWS_EC2_KEYFILE_PATH
- AWS_EC2_USERNAME
- AWS_WEBSERVER_HOSTNAME
We’ve set the Log text field to look for text that only appears in the log file when the WAR file is successfully packaged, and we’ve selected the checkbox to skip this step if the log text doesn’t appear. We did this to prevent trying to upload a file that doesn’t exist. We’ve also set the Escalate script execution status to job status option so that the job fails if this step fails.
The final step is to add a second post-build task to call the gateway service to validate that the application is working. Scroll down to expose the Add another task button and complete the dialog box as shown.
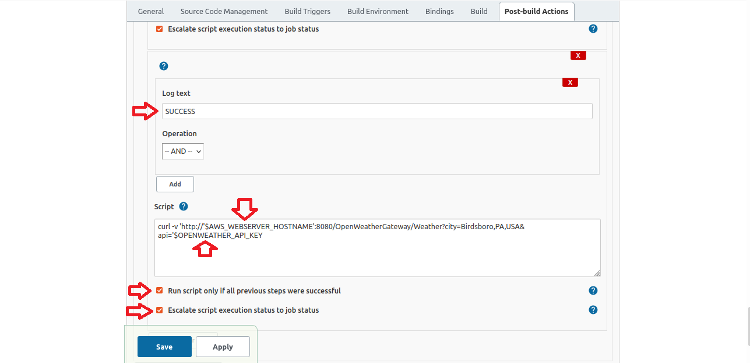
The complete script is:
curl -v 'http://'$AWS_WEBSERVER_HOSTNAME':8080/OpenWeatherGateway/Weather?city=Birdsboro,PA,USA&api='$OPENWEATHER_API_KEY
The script references two Conjur secrets: AWS_WEBSERVER_HOSTNAME and OPENWEATHER_API_KEY. The -v option shows that Jenkins protects the secrets in the log.
Click Save to save the project.
Test the Project
To test our project, click Open Blue Ocean.
Since this is a new freestyle project, we see this page when we open it in Blue Ocean for the first time:
Click Run to start it.
Click OPEN to follow the job process.
When the job is complete, we see this screen:
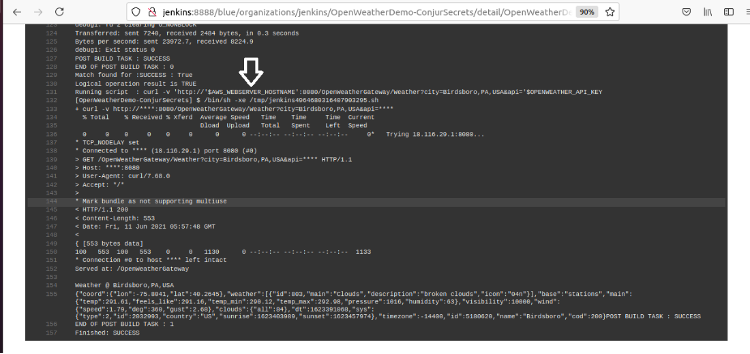
If we scroll to the end of the log, we see the text shown below. The arrow points to the curl command that called the OpenWeather gateway. Notice that any data provided by secrets either shows the environment variable or masks it with asterisks. This protects the secret even in logged data.
Summary
Congratulations! We have two complete Jenkins pipelines fully integrated with CyberArk’s Conjur. We’ve purposefully used generic scripts so that they can be used as templates for other projects. Take some time to compare these pipelines to other build scripts you have created, and you’ll see how Conjur can help by:
- Centralizing secret storage outside the scripts.
- Securing sensitive data, including passwords and controlled data using Conjur’s Role-Based Access Control policies.
- Providing a way to parameterize scripts using secrets for deployment data such as hostnames.
- Using bindings to connect environment variables to Conjur secrets to decouple a script from the secret source.
To learn more about Conjur and how you can use it to secure your Jenkins pipelines, see Secure CI/CD Pipelines. Continue to the next article in this series to learn how to use secrets stored in Conjur in a Jenkins scripted pipeline.

Mark Hurter has 20 years of experience in the fields of application development, communications security, IT systems administration, and information security. Currently, he is a DevSecOps Specialist for CyberArk Software Inc. He holds a bachelor’s degree in Computer Science from Troy University and a Masters of International Business from the University of Alabama. He maintains several IT industry certifications including VMWare’s VCP6, MCSE: Server & Cloud Infrastructure from Microsoft, and AWS Certified Solution Architect Associate. In his free time, Mark can be found exploring the outdoors ranging from the mountains to the bottom of the ocean.