
The Conjur OpenAPI is a language agnostic API description standard that allows for both human and machine users to investigate a given API without documentation or implementation details, simplifying processes for developers with a single source of truth.
Conjur is an open-source secret management tool with a full-featured REST API that exposes the platform’s functionality. The details of the API are available in an Open API specification, which allows any tools supporting the OpenAPI to integrate with Conjur.
AWS API Gateway is one such platform supporting the OpenAPI specification. API Gateway is a managed service that typically sits in front of a web service and exposes it to network traffic. API Gateway takes care of many common, cross-cutting concerns like high availability, rate limiting, secure access using HTTPS, and monitoring. It removes the need to implement these features in backend web services.
API Gateway offers the ability to import an API defined in an OpenAPI specification. In this blog post, we’ll take advantage of this import feature to expose an instance of Conjur behind a gateway.
Downloading the Conjur OpenAPI Spec
The Conjur OpenAPI spec is available on GitHub. The project source code contains the OpenAPI spec broken down into several of individual files. On the releases page, you’ll find many different compiled assets, including an asset named conjur-openapi-bundled-v5.1.1.zip. Note that version 5.1.1 is the latest release at the time of writing, but that later releases will have higher version numbers in the filename.
The bundled assets include a single YAML file that is suitable for importing into the API Gateway, so we download and extract this archive on our local PC.
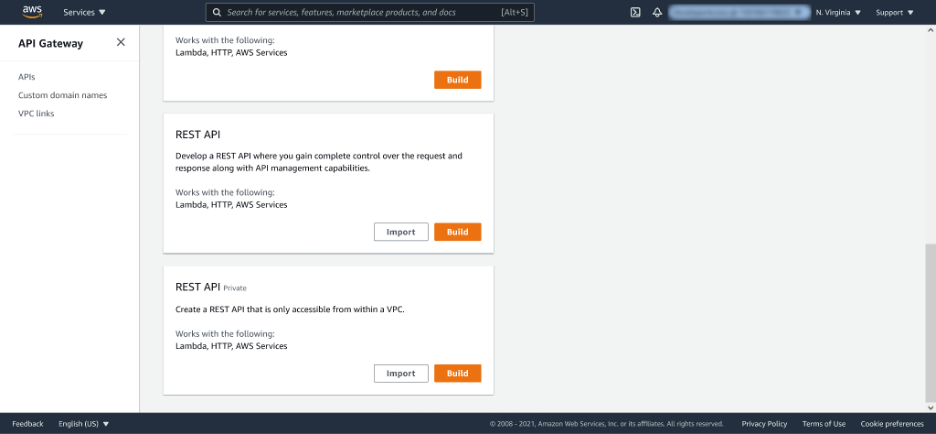
Creating an API Gateway REST API
API Gateway offers many different types of APIs. We created a REST API for this example.
From the API Gateway console, select the APIs link on the left-hand side, and click Build next to either REST API or REST API Private. The decision to create a public or private API depends on whether you want to expose Conjur to the public Internet, or if you only want to expose it to clients running on your private AWS infrastructure. A secrets manager like Conjur will likely only be made available within your private networks, but the process for importing and configuring the OpenAPI specification is the same for both.
The next screen provides the option to import an OpenAPI specification. API Gateway also refers to this file as a Swagger specification, as the Swagger project originally defined the specification before it was formalized and handed to the OpenAPI initiative. But the two terms are interchangeable as far as the API Gateway is concerned.
After renaming the specification file from spec.yml to spec.yaml (to accommodate the extensions recognized by the API Gateway file) select the Import from Swagger or Open API 3 option. Click Select Swagger File, and open the Conjur OpenAPI specification file that we downloaded earlier.

Scroll down to the bottom of the page, select the Ignore warnings option, and click Import.

In a perfect world, the API Gateway would import the specification file and we would have a freshly configured API. Unfortunately, the version of the specification file available at the time of writing isn’t quite ready to import into the API Gateway. The GitHub project provides this warning:
While AWS API Gateway provides a workflow for setting up a new API by importing an OpenAPI spec, many OpenAPI features aren’t supported. This precludes this project from being completely compatible.
This means we get a screen full of red text like this:
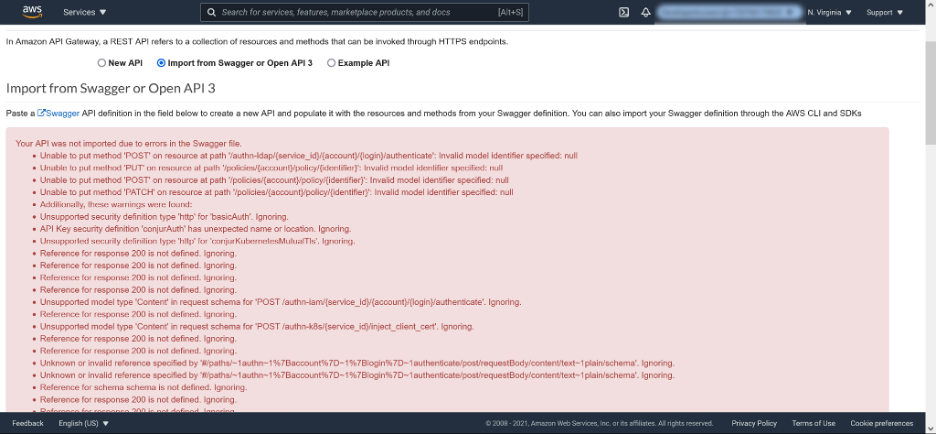
The output looks scary and is not easy to read, but fortunately, with a few tweaks, we can import the specification file successfully.
The important thing to realize about the error messages is that everything below the text Additionally, these warnings were found are warnings that we can ignore. This leaves us with four errors to resolve:
● Unable to put method ‘POST’ on resource at path ‘/authn-ldap/{service_id}/{account}/{login}/authenticate’: Invalid model identifier specified: nul
● Unable to put method ‘PUT’ on resource at path ‘/policies/{account}/policy/{identifier}’: Invalid model identifier specified: null
● Unable to put method ‘POST’ on resource at path ‘/policies/{account}/policy/{identifier}’: Invalid model identifier specified: null
● Unable to put method ‘PATCH’ on resource at path ‘/policies/{account}/policy/{identifier}’: Invalid model identifier specified: null
Let’s diagnose the first error. Open the YAML file and search for the property called /authn-ldap/{service_id}/{account}/{login}/authenticate. This property has a child property called requestBody with the following values:
requestBody:

  content:

    text/plain:

      schema:

        $ref: '#/paths/~1authn~1%7Baccount%7D~1%7Blogin%7D~1authenticate/post/requestBody/content/text~1plain/schema'

  description: API key

  required: false
The $ref property is the cause of the error. The easiest way to resolve the error is to delete the entire requestBody property.
The next three errors refer to the endpoint called /policies/{account}/policy/{identifier}. This path responds to three different HTTP methods: PUT, POST, and PATCH. Each of these methods has an associated requestBody property with a similarly misconfigured $ref property. We need to delete those three requestBody properties to import the file.
Having removed the four offending requestBody properties from the specification, we can now successfully import the file into the API Gateway, with the result being a tree of resources corresponding to the Conjur API.
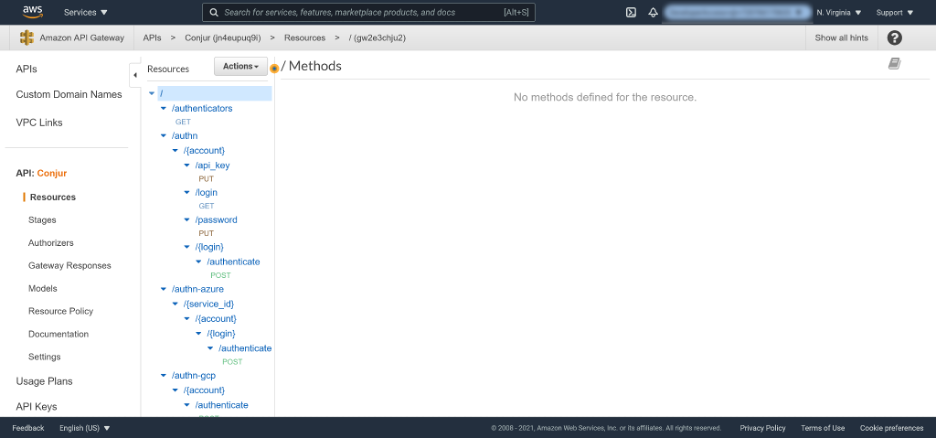
The ability to import dozens of API endpoints with a single operation highlights the convenience provided by an OpenAPI specification. To build the API Gateway resources manually would have required the painstaking and error-prone process of mapping the Conjur API to the API Gateway one endpoint at a time. By importing the OpenAPI specification, we’re ready to link this API up to an instance of Conjur with just a few clicks.
Linking the API Gateway to Conjur
Importing the OpenAPI spec creates a scaffold in the API Gateway with all the API resources and methods defined. The next step is to connect the API Gateway to an instance of Conjur.
In this example, we’re running Conjur on an EC2 instance with the IP address 3.231.212.244. You must replace this IP address with the location of your own Conjur instance in all of the examples below. You can find details on how to install Conjur from the documentation.
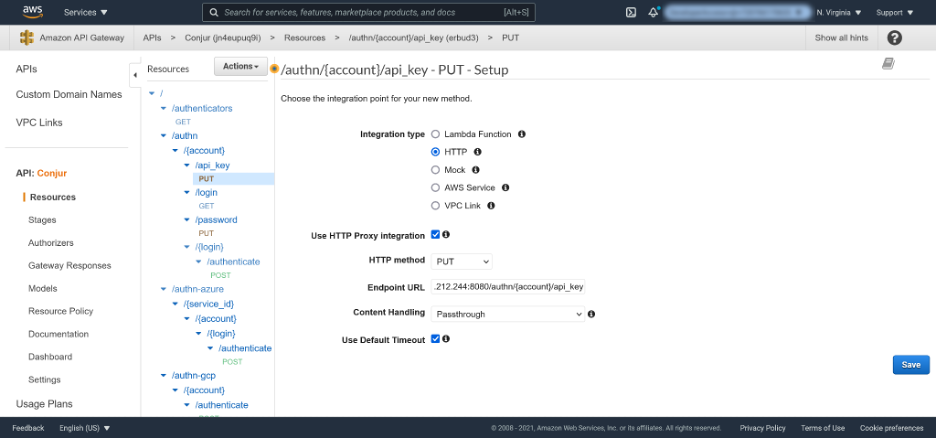
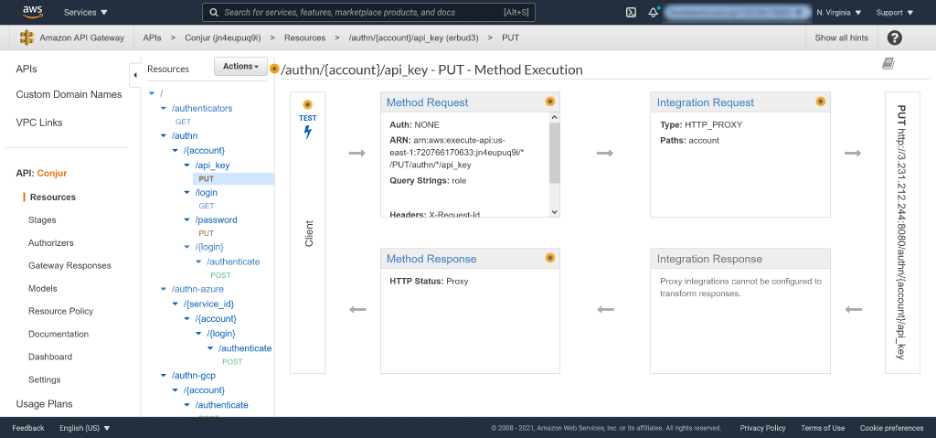
To link an API Gateway method, click the method (like GET, PUT, POST, PATCH, or DELETE) in the resource tree.
In the screenshot below, PUT is the selected method for the /authn/{account}/api_key resource. This presents a form to define the downstream service.
Use the HTTP integration type to have the API Gateway forward the HTTP request it receives to the API exposed by our instance of Conjur. The Endpoint URL is the IP address of the server hosting Conjur, followed by the resource path. So, in this example, the Endpoint URL is http://3.231.212.244:8080/authn/{account}/api_key.
Path elements wrapped in curly brackets, such as {account}, are variables that match any text. In this example {account} matches the name of an account in Conjur.
Enable the Use HTTP Proxy integration option, which instructs the API Gateway to pass the entire request and response between the frontend and the backend.
You can leave the remaining fields with their default values. Click Save to save the changes.
Once saved, the method displays the following diagram showing how a request flows from the API Gateway to the backend integration. It also shows how the backend responds to the client:
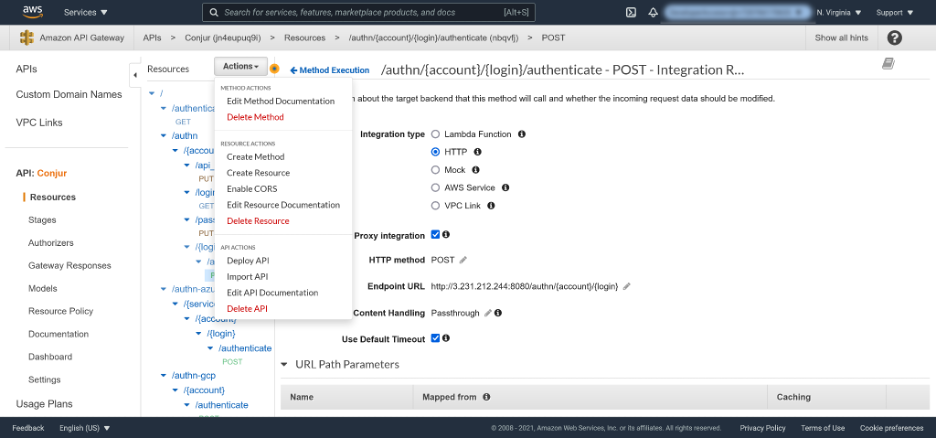
You need to repeat the process of linking methods to backend integrations for each method. Once complete, the API Gateway is ready to deploy the resources to a stage.
Deploying the API Gateway Stage
The resources and methods we have been working with exist in a staging area that we haven’t exposed to any traffic. To expose the API, we need to deploy it.
Click the Actions menu and select the Deploy API option:
Select [New Stage] from the Deployment stage list and enter “test” as the Stage name. Click Deploy to deploy the API to the new stage:
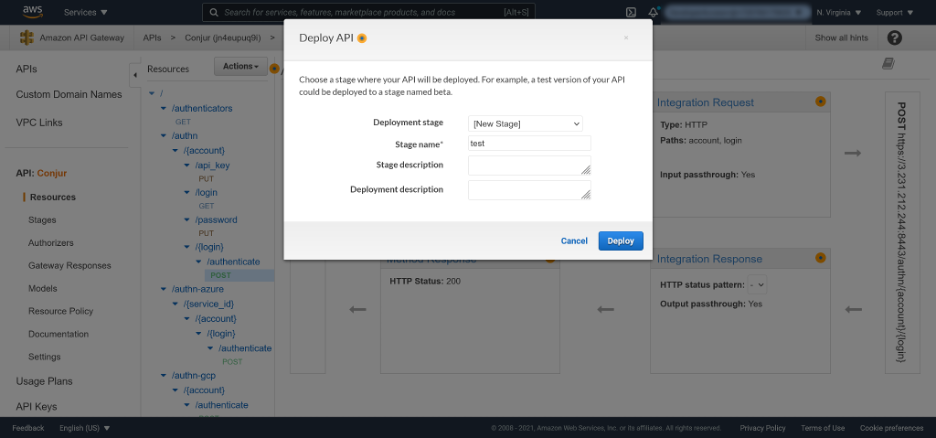
Each stage has its own unique URL, shown in the blue box with the label Invoke URL. This URL has a hostname generated by the API Gateway, and the path includes the name of the stage:

Notice that the API Gateway URL implements HTTPS by default. This is a nice feature because it allows us to securely expose our Conjur API without the overhead of configuring certificates.
With the resources deployed to a stage, we are now ready to call Conjur using the API Gateway.
Calling Conjur Using the API Gateway
To demonstrate calling the Conjur API using the API Gateway, we request the /authn/{account}/{login}/authenticate endpoint.
The following curl command executes an HTTP POST request with the account of myConjurAccount, login of host/BotApp/myDemoApp (the URL encoded equivalents of %2F replace the forward slashes), and supplies the API key in the body of the request:
curl -d "3hjk9ex1yaaqbe3v6227rsayv3385g7q337bpdbbayzrmk1zt38zz" -k https://jn4eupuq9i.execute-api.us-east-1.amazonaws.com/test/authn/myConjurAccount/host%2FBotApp%2FmyDemoApp/authenticate
The resulting JSON blob is a temporary access token that looks something like this:
{"protected":"eyJhbGciOiJjb25qdXIub3JnL3Nsb3NpbG8vdjIiLCJraWQiOiIxOTMyOGEyNjMzZDE5YjJiMWY1NjdkZjQ5ZThiMDZmNzJiM2I1MzBhOTVkMmIzMGJkZTFhNDI2MGVmZWEyY2QyIn0=","payload":"eyJzdWIiOiJob3N0L0JvdEFwcC9teURlbW9BcHAiLCJpYXQiOjE2MjgzMzE1NjR9","signature":"S3bWGL7tcuEtZM0F99tofjAXdK0pTkAoGuA_8CmCZp6mJKzvjwA7qek5yKum2RZsfV20reCe_uGd8LWpDW3Ef69A2idau06gR0ymlVzcCEnCz7MNPO7uvMRBaJm5_CxKiIwA94wJV1zsaGmuhDFq96bBB8e-HoWt9xfrWaJkT1JHg4uXA0ggkaIp-a3-KN_yb52JNe313fBY9uUQtHnZZDEnmGz7-RUPZmOL2Rir5f-snomlPsPXSP-3Zao4OMZxISVH6__ancWiPsQ7jg8f-qXyPTORVwoqb4pSwHrdOtOraYlOnkOSvN_YgPf3T-8cQkFAfAmUiK2lJZo5u1XxiEv5mLpEOGm0B3-bEvCIXARUGVtQr4VhpKR0Nz-Q9WNO"}
We can use this token to make subsequent requests to the API. To verify the token, we need to base 64 encode the JSON file and include it in the Authorization header when calling the /whoami endpoint:
curl -H "Authorization: Token token=\"eyJwcm90ZWN0ZWQiOiJleUpoYkdjaU9pSmpiMjVxZFhJdWIzSm5MM05zYjNOcGJHOHZkaklpTENKcmFXUWlPaUl4T1RNeU9HRXlOak16WkRFNVlqSmlNV1kxTmpka1pqUTVaVGhpTURabU56SmlNMkkxTXpCaE9UVmtNbUl6TUdKa1pURmhOREkyTUdWbVpXRXlZMlF5SW4wPSIsInBheWxvYWQiOiJleUp6ZFdJaU9pSm9iM04wTDBKdmRFRndjQzl0ZVVSbGJXOUJjSEFpTENKcFlYUWlPakUyTWpnek16RTBNRGw5Iiwic2lnbmF0dXJlIjoickFnSmtnVTdGdlZsVEl4WHQwOEpJQ2s5aGZFNlJCTkNZenkwR2syNFgyZmtUcTYwX0d1UmVuV3J2SzQzQWw5WVA4Q29DeTRGaXdfX3E3RVk5bU1RWmQ1SHFDMUY4MEFYWW81dG52Vmd1REZRc0lnYldmSXNndVhCekdDaEhYd25IcVBzSkFpLXZpQjJzdGh2OE5maGVtN05TVlk1NWcweGxVOVB3NVZiSTlXc0Z2VmFPQ1R5ZGtSb0J1dW81NGpCcnAzOXliMDFybWVZSE1DeW9qUG1vdHBjN2dCMzFFTzVOalhZRXBZLXl5MUdnVkNrODdwdm4zVVkwZHhFWXdCTDVFR3NoNXBkV19jMF9LZktCSV9IU05NcmQ0Q2FNT0dRR3ZCNU1wb0kyRXRCWUVBWElZbnBZNFVVbnM2LXJfZ0pQYzNvMlhVMUo3akRUTF9aU3NUV0RYVU14Rno0TGJNSXNubGUwMUlBcUJpelE1YkpkUWU1VVFXYWVNc1UydUx6In0=\"" https://jn4eupuq9i.execute-api.us-east-1.amazonaws.com/test/whoami
The result should look something like this:
{"client_ip":"3.216.139.106","user_agent":"curl/7.68.0","account":"myConjurAccount","username":"host/BotApp/myDemoApp","token_issued_at":"2021-08-07T10:16:49.000+00:00"}
And with that, we have successfully demonstrated that requests to the Conjur API using the API Gateway work as expected.
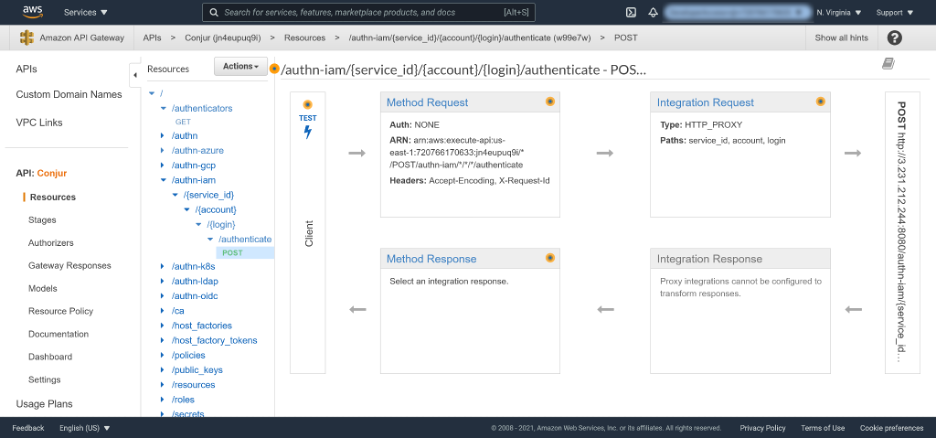
Note that because the /authn-iam/{service_id}/{account}/{login}/authenticate resource is exposed, it’s possible to log into Conjur using the native IAM integration:
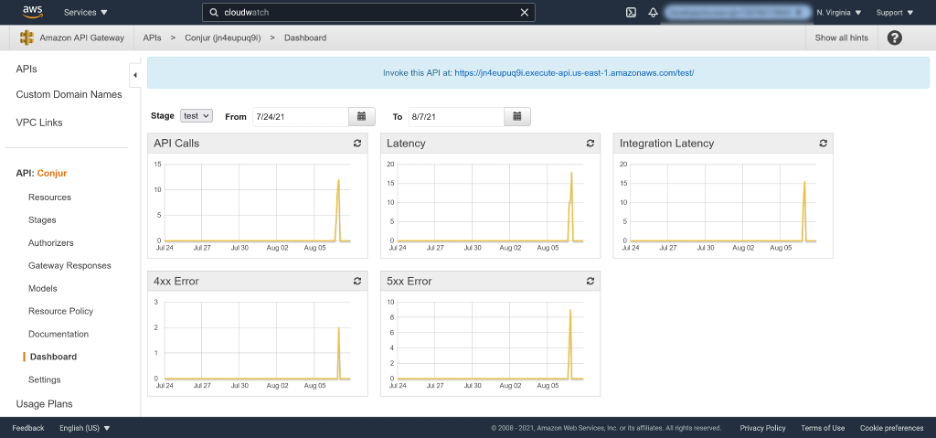
We noted in the introduction that the API Gateway provides monitoring features. Clicking the Dashboard link shows charts reporting on common metrics like the number of calls, successful requests, unsuccessful requests, and latency.
Conclusion
Exposing an API to production workloads requires more than ensuring clients can make the required network requests. Critical services like Conjur must be highly available, monitored, and securely exposed using HTTPS.
By importing the Conjur OpenAPI specification into the API Gateway, administrators can take advantage of the security, reliability, and monitoring features built into the platform. This enables us to deploy Conjur into production environments with less effort and more confidence.
In this post, we looked at how to import the Conjur OpenAPI specification into API Gateway, how the API Gateway integrates with Conjur and verified the deployment with example API calls. By following these steps, you can deploy your own API Gateway instance to expose Conjur securely and reliably to your own services.